Until fairly recently if you were a Mac user and you wanted to use a version control system like Subversion you didn’t have much choice as far as client apps went. If you didn’t have the terminal skills to work via the command line and wanted use something with a nice GUI then you had to choose from apps that were either incomplete or not particularly Mac-like.
However, the latter half of 2008 brought a lot of change in regards to Subversion client apps for OSX. It’s kind of like with buses, if you wait long enough several of them come along at once ;)

Subversion clients from A (Adobe Dreamweaver) to Z (ZigVersion)
To give the various apps available thorough overviews is beyond the scope of this article, so I’m just going to list the various apps that are available and point out some of their features.
Adobe Dreamweaver CS4
Dreamweaver CS4 added support for the Subversion version control system, something I’ve long thought would be a great feature and one which via an extension was available to Windows users. However, I don’t think the implementation of it in Dreamweaver CS4 is as good as it could be.
 One issue in particular is that the commands for Checking out and committing to a repository are the same as those used for the regular Checkin / Checkout functions of Dreamweaver which I think is a bit confusing as they are very different features. Using these terms is a problem as they don’t match up with the correct terminology used in Subversion. Dreamweaver is often the first app (rightly or wrongly) that people who are learning how to make websites use so there’s a bit of a responsibility for it to teach people correctly and to encourage good habits.
I consider Dreamweaver CS4’s SVN integration to be a good first step but it could do with improvement to make it more usable. Unless you use Dreamweaver already then you’re probably not going to start doing so just to get access to its Subversion integration. But if you’re already a Dreamweaver user then it does offer some useful functionality, and if you’re a DW user but have never used version control then it’s a good enough place to start!
Dreamweaver CS4 costs $399 for a commercial licence but there are also educational licences and there is also a 30 day trial.
→ Go to the Dreamweaver CS4 website
ZigVersion
When I first started using Subversion ZigVersion was the best solution for OSX that I tried. It was the most user friendly / easy to use out of all the clients available at the time such as SVNX, Syncro SVN and SCPlugin. I’ve always used a hosted Subversion repository ever since I started using Subversion so I was needing an application that would allow me to easily connect to an external server. ZigVersion made it pretty easy to do that, and to an SVN noob it was fairly easy to understand what was going on.
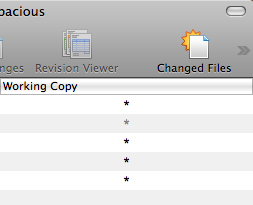 Once connecting to my SVN repository it was quite easy to create a working copy and update it from the repository files. After working on files it was easy to find the updated files with a simple click on the ‘Changed Files’ icon in the menubar. Only the new or updated files would be shown which could then be selected and checked in to the repository with appropriate comments added at the same time. It was also easy to get access to revisions of files via the ‘Revision Viewer’ button.
It’s a pretty straight forward application and does the job, one criticism would be that the interface is fairly unexciting in appearance. I mainly say that as this is a review of Mac OSX Subversion GUI apps so the visual appearance is important and the main reason why I’m not including SVNX or Syncro SVN amongst these applications.
ZigVersion costs $99 for a commercial licence but is free for non-commercial use. There is also a 30 day trial period.
→ Go to the ZigVersion website (Zigversion no longer appears to be available)
Versions
We’re now getting into the mac-daddy territory of Mac OSX Subversion apps. Versions was the first of the new wave of Mac SVN apps, despite showing as "coming soon" for over a year and feared by many to be vapourware.
However, although it was delayed the app was launched and it delivered on its promise of providing a much more Mac-like app for dealing with Subversion repositories and the tasks involved with working with them.
 Versions’ main tool bar provides buttons for Update, Commit, Checkout and other options, just under the main toolbar there are three tabs, Timeline, Browse and Transcript. The Timeline tab gives you a timeline in the form of a list of revisions and accompanying notes which makes it easy to view the changes made over a period of time. The Browse tab allows you to view the repository files and view history of individual files as well as comparing, managing blame and also a Quick Look option for quickly viewing the contents of files.
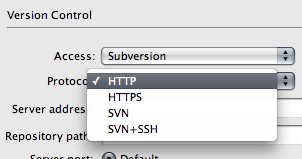
There is a quick setup button that will get you setup with an account at Beanstalkapp.com who provide online SVN repository hosting, there’s a free account offering one repository to get you started with various tiered pricing options after that.
Versions deserves credit for really raising the bar for Mac SVN apps, the teaser page had me longing for months for them to launch the app! Although in the end I had give up waiting and buy ZigVersion instead in order to get some kind of GUI access to my repository.
Versions costs €39 (approx $50) for single user licence, there is a 21 day trial period.
→ Go to the Versions website
Cornerstone
This is the Subversion app I’ve been using the most out of all of them recently, although it’s a pretty close race between it and Versions. Cornerstones’ interface is well thought out and well designed and by that I don’t mean just good looks but that it provides a great feature set for working with multiple SVN repositories.
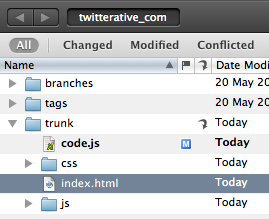
 You can easily filter the working copy files in different states such as Changed, Modified, Conflicted, Unversioned and Locked. The ability to filter files this way is an essential feature in an SVN app, finding changed files in order to commit them to the repository is one of the most things I do.
Cornerstone also offers a great horizontal timeline view that displays the various revisions which is great for quickly reviewing the details of each revision such as dates, times, Revision notes and changes made.
Cornerstone costs $59 for a single user licence but you can use a trial version for 14 days to check it out.
→ Go to the Cornerstone website / → Buy Cornerstone from the Mac App Store
Coda
Coda is a text-editor for web development, its main strength being the integration of several aspects of the common web development workflow: text editor, FTP, CSS editing and Terminal. In a recent update the application now has integrated Subversion support which adds it to this growing list of OSX Subversion clients.
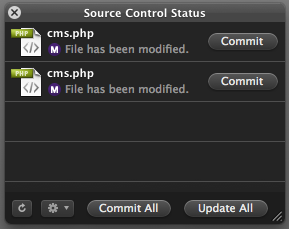 Coda’s SVN integration adds a simple source control status window that quickly highlights changed files making it easy to find updated files and commit them to the repository. There is also easy access to a Source Control menu option offering committing / discarding changes, refreshing, comparing and updating the repository.
It is smoothly integrated into the workflow of Coda and rounds out the feature set of the application and it’s aim to provide a one-window web development environment.
Coda costs $99 for single user licence, there’s a 30 day trial period.
→ Go to the Coda website
Closing – Rise of Git
Ironically as all of these Subversion apps start to appear many people are starting to switch to using Git instead of SVN! There are a couple of Mac GUI apps for Git available so far such as GitX and Gitnub so check them out if Git is more your thing.
Update: Couple of new Subversion / Git apps on the Mac App Store
If you’re using Beanstalk for Subversion / Git hosting you might want to check out the app Magic Bean for Mac too. There’s also an app called SourceTree which supports Git and Mercurial and also has some support for Subversion. I haven’t tried either app yet but worth a look I think.
 Even though it’s not new to version 2 it’s worth mentioning that Cornerstone actually includes Subversion 1.4, 1.5 and 1.6 within the application itself. Although Mac OSX already includes Subversion having multiple versions right within Cornerstone itself means you can work with repositories that use different Subversion releases and also not have to worry about whether any OSX updates affect your existing Subversion repositories. This also helps to make sure that your local repository data is backed up via Apple’s Time Machine backup process too.
 Mac OSX 10.6 brought quite a few new but subtle features and changes, one of those subtle changes was the dropping of support for the AppleTalk protocol. Many people who upgraded to Snow Leopard (or newer versions of OSX) got caught out and suddenly found themselves with a non-functioning printer.
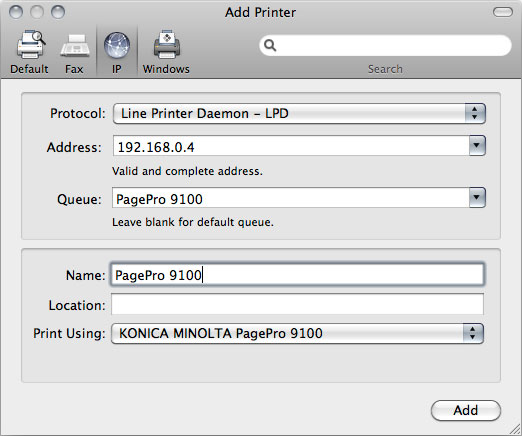
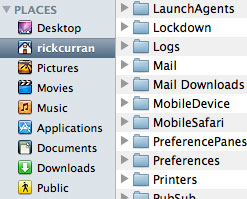 To do this you need to navigate to the ‘Mail Downloads’ folder which you’ll find in your user account folder (the folder with your name and the Home icon), then go into the ‘Library’ folder and you should see the ‘Mail Downloads’ folder. Note: Since OSX 10.7 Lion came out the ‘Library’ folder is hidden by default, to get to it you need to access the ‘Go’ menu in the Finder whilst holding down the alt key.
 Apple have
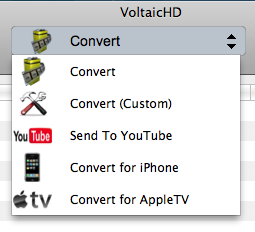 Along with the new preview / edit capability there is also the ability to convert and upload trimmed clips to YouTube directly from VoltaicHD 2.0. There are also preset output options for iPhone / iPod and AppleTV.
 Navigate to the location of your MySQL databases. For my MySQL install this is found at /usr/local/mysql but depending on how you’ve installed MySQL it might be elsewhere.

 The next step is to rename your MySQL data folder temporarily to avoid any clashes when restoring the data folder from the Time Machine backup. First you need to get into your MySQL directory:
 Go back in time a sufficient amount so that you’ll definitely be getting the version of the data that you want, highlight the data folder and click Restore. Because we renamed the data directory Time Machine will simply restore the data directory without any prompts. You should now see both the restored data directory and the renamed data-bak directory.