11 years of iPhone images

Back in 2011 I started compiling short videos with all of the images that had been on my phone over the year. I did 2010 through to 2015 and then after that year I just never got around to compiling the following years. But with a welcome break over the holidays and 2020 over and done I finally made time to compile the missing years videos. In some of the previous years I’d made a custom audio track, but for these ones I just looked for suitable tracks amongst YouTube’s free audio, I think they work quite well though.

I’m tempted to make one massive video with 11 years of video but I think this may be a bit too long! :) Here’s all 11 videos so far:

iPhone view of 2020

iPhone view of 2019

iPhone view of 2018

iPhone view of 2017

iPhone view of 2016

iPhone view of 2015

iPhone view of 2014

iPhone view of 2013

iPhone view of 2012

iPhone view of 2011

iPhone view of 2010

How to fix – “LSLaunchProhibited Info.plist key is unsupported on Mac”

I don’t do a lot of iOS development but I do have a sticker pack and an app in the app store. I recently got an email from Apple developer support with the following message about my sticker pack:

Compatible iOS and iPadOS apps will automatically appear on the Mac App Store when the first Apple silicon Macs become available this year. However, we noticed the following issues with one or more of your apps that are opted in to appear.

The following apps will not be made available on Mac until a new version addressing these issues is submitted.

These apps contain the LSLaunchProhibited Info.plist key, which is unsupported on Mac:

I wasn’t quite sure what that meant and the email didn’t really give any indication as to how to fix it. A quick google search only came up with one single result, a forum post on Apple developer forums by someone trying to find an answer to the same question! :)

After having a quick look around in Xcode I *think* I’ve found the answer to the issue. Basically with the new Apple silicon Macs that have been announced it will be possible to run iOS apps on Mac and by default all iOS apps will be included in the Mac App Store. It is possible to specifically opt-out of having your app in the store but by default it will be included, so in this case the message relates to the fact that my sticker pack isn’t currently set to be available on Mac, only iPhone and iPad.

To resolve this you need to go to the sticker pack extension file of your Xcode project, under the “General” tab there should be a “Deployment Info” section. In there you can set whether it will work on iPhone and iPad, and if you’re running the latest version of Xcode there should also be a “Mac” checkbox. Checking that box will make the sticker pack available for Mac. Once that is done and a new build submitted to the app store this should then resolve this issue.

An illustrated history of iOS

Back in December 2014 I published a post about a great “llustrated history of Mac OSX” made by the makers of the Git client ‘Tower’ for Mac and Windows Since that time they have continued to update it to include more recent releases (and also the change the title to use “macOS” as Apple’s OS is known as now).

I noticed recently that the team at Tower have now followed up their OSX / macOS history with an “Illustrated history of iOS” which is a great concise history of Apple’s mobile operating system. It’s a nice little run through of the progress of iOS from 2007 until now.

Sidenote: I see Tower have just launched a public beta of an all-new version of their Git client, find out more on their blog: https://www.git-tower.com/blog/tower-public-beta-2018-starts/

How to fix “unable to boot device because it cannot be located on disk” in Xcode 9

I have recently been doing some development using the Xcode 9.2 Beta, but when it came to pushing the app to iTunes Connect I made the switch to the final release version of Xcode 9.2. In the process I ran various clean up tools to remove the beta version and related files etc.

However, after downloading and installing the release version of Xcode 9.2 and trying to test using the Simulator I encountered the error:

unable to boot device because it cannot be located on disk

This error also included a link to a location within simulator files which obviously is no longer there due to the clean up process I had used. I tried a few options but eventually found a series of commands that clean this up and fixed the problem for me. Make sure to quite Xcode and the Simulator app first and then run these commands in Terminal:

sudo killall -9 com.apple.CoreSimulator.CoreSimulatorService
rm -rf ~/Library/Developer/CoreSimulator
rm -rf ~/Library/Developer/XCPGDevices

Hopefully after running them and starting Xcode the Simulator devices should all be functional again. Please note that if you have done any custom devices within your Simulator device list then these will have been deleted and the list reset to the default list of devices.

Remotely debugging mobile devices: Remote web inspection in Safari and iOS6

It doesn’t take a genius to note that mobile devices are pretty much overtaking the web, and that a huge amount of people – the majority depending on the statistics you pay attention to – are accessing the web via a mobile device such as an iPhone, iPad or other smartphone / tablet.

As such there has been a huge buzz about responsive design and how to make sites adapt well between a range of screen sizes and resolutions, and moving away from the concept of a fixed size of screen such as the ubiquitous 960 pixel grid framework. One of the biggest challenges in this new era of web design and development has been the lack of good tools to aid you in the process of creating responsive, adaptive websites.

Media Queries and Responsive Design

The ability to work in code and create media queries to handle various device widths and related styles has been possible for a while, but it can be a bit mind-melting trying to keep track of all of this and to test as you work through the development process. Fortunately we are now beginning to see a range of tools to help you develop responsive sites, one of the most recent being Adobe’s new Edge Reflow tool which is an app that lets you visually adjust the viewport and tweak the CSS of various media queries. It’s a simple, focused app that lets you resize the viewport and tweak the styles as you go. At the time of writing it hasn’t been released yet but when I get a chance I will definitely be checking it out and writing something about it.

Remotely Debugging Code on Mobile Devices

Another challenge with working with mobile devices is that you really need to test on actual mobile devices to get an understanding of the true behaviour of them. Although you can set the width of your desktop browser to be the same as that of an iPhone it won’t necessarily behave exactly the same way due to the differences in the way the browsers handle CSS or JavaScript.

One of the difficulties in testing on devices themselves is that it’s not very easy to debug when things don’t work as expected. On a desktop browser such as Safari you can use the Web Inspector to see the live code as you interact with it and also see any JavaScript errors that are triggered, but on a mobile browser there is often little available to help you detect the errors.

Thankfully there are now tools being developed to allow remote access to the code running on the device itself, Adobe developed a tool codenamed ‘Shadow’ (now formally released as Edge Inspect) which works by providing apps for various mobile devices such as iPhone, iPad, Android phones and tablets.

With these apps installed on your devices you then run a desktop app on your computer as well as an extension in Google Chrome. You can then view websites in Chrome and they will be simultaneously displayed on the mobile devices running the apps, but the key feature is that you can remotely inspect the HTML, CSS and JavaScript running in the app on those devices. A really excellent tool.

Remotely Debugging in Safari

Adobe Edge Inspect (formerly Shadow) is a great tool, but what if, like me, you prefer to work in desktop Safari as your main browser and don’t want to or can’t use Chrome to test sites? In case anyone thinks this is just down to a matter of personal preference of browser I can give a legitimate example of why having to use Chrome can be a problem – Chrome’s in-built support for Flash gets in the way of testing content that is intended as fallback or alternative content on the desktop.

Screenshot of Web Inspector settings in iOS6 on an iPhoneFortunately the recent release of iOS6 offers a new feature that enables remote web inspection of mobile Safari on iPhone or iPad.

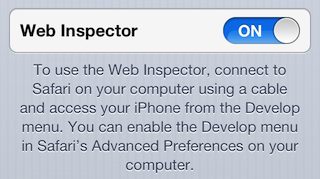
To make use of it you need to go into the ‘Settings’ app on your iOS device, and drill down into ‘Safari->Advanced’ where you’ll find a new toggle button for ‘Web inspector’, (this replaces the old ‘Debug’ option in mobile Safari which really offered little functionality).

Switch this on and you’ll see a small paragraph of text appearing which explains that you need to connect your device to your computer with a cable for this feature to work.

Once you’ve enabled Web Inspector on your iOS device(s) then you should find them listed in the Develop menu in Safari on your computer, it should looks something like this:

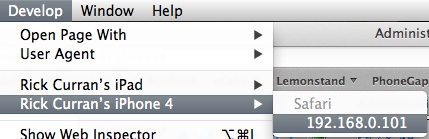
You can select the device and then it opens up a menu showing the available applications that web inspector can open. Note that you need to have mobile Safari open on your iOS device for any sites to be listed in the menu, if they’re not open then you’ll get a message saying ‘No Inspectable Applications’.

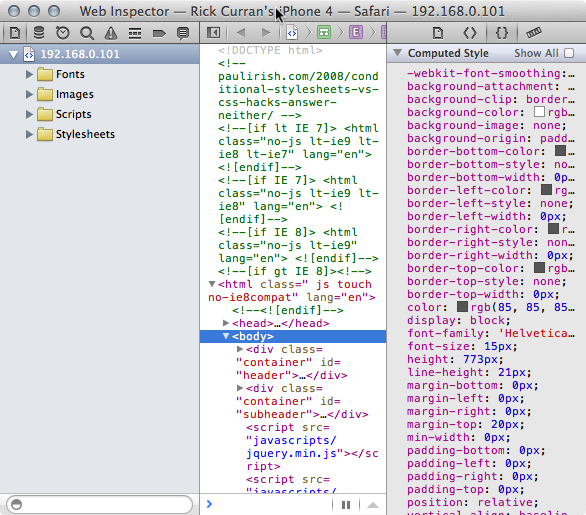
Once you select a site from the menu then the familiar Web Inspector window in Safari on your computer will open, the difference is that you are seeing the HTML, CSS and JavaScript from your iOS device. You can then browse around and interact with the site on your iOS device and inspect all of the changes occurring right in Web Inspector. Here’s a view of the HTML from a site on my iPhone:

Debugging via the console remotely

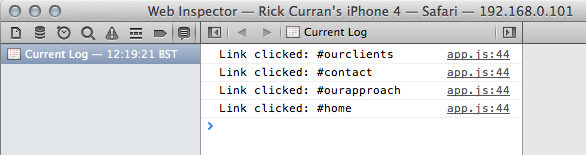
Just as with the ‘regular’ web inspector you can interact, view and update HTML and CSS and then see these temporary tweaks appear right on your iOS device. The main benefit in debugging for me has been in dealing with JavaScript / jQuery code, I can make use of console.log messages and debug via the console just as I would when working on my computer:

In a recent jQuery mobile based site I was developing I encountered code that was failing in mobile Safari but working fine in Safari on my Mac – exactly the kind of situation I mentioned earlier in this article where code is handled differently in mobile Safari. But thanks to this new remote web inspector functionality I was able to easily add some console messages and figure out what was going on and adjust the code to work around the problem.

A Great Solution for iOS Web Development and Testing

iOS6’s remote web inspection functionality is definitely a huge improvement if you are making sites that you need to test on iOS devices. With the increase in Android-based devices such as Google’s Nexus 7 and Amazon’s Kindle Fire tablets you will of course need to test on other devices besides iPhones and iPads. So tools like Adobe’s Edge Inspect are definitely something you will need to make use of too for testing across the various platforms and devices, but the simplicity of this iOS-specific testing workflow is very easy to set up and work with. A definite two-thumbs up from me!

I’m going to take a look at some of the other tools available to aid in the contemporary web development workflow of responsive, mobile-friendly design and write some more posts about them soon. In particular an updated look at Adobe’s Edge Animate tool and also a look at the Edge Reflow tool once it has been released.

Tip: Fix for iPhone voicemail stopping working after upgrading to iOS6

Along with a gazillion other people around the Globe I upgraded my iPhone to the new iOS 6 software that just came out, everything worked fine during the upgrade but afterwards both myself and my work colleague found that our iPhone voicemail no longer worked.

In this case my iPhone is on the UK’s Orange network (soon to be known as EE) which along with every other carrier apart from O2 doesn’t give you the nice Visual Voicemail the way that Apple intended. Instead voicemail is accessed just like any other mobile phone since the 1990’s by pressing a voicemail button which then dials a number and you then access the voicemail by pressing numbers on the keypad.

However, I couldn’t even get that far, tapping the voicemail button just came up with an error messaging saying that voicemail was not configured and to get in touch with the phone company (or words to that effect). I looked up some support forums for Orange and on the Apple site but didn’t find anything recent relating to iOS6 but I did come up with something from a while ago which seems to have done the trick!

First you need to find out what the actual number is that you need to call to access voicemail, for Orange this is simply ‘123’. The next and final step is to enter the following sequence into the phone dialer on your iPhone but making sure to substitute the ‘123’ in my example for whatever the number is for your phone service’s voicemail:

**5005*86*123#

Just enter that and hit dial, the screen should flash quickly and after that your voicemail should now be working! If it doesn’t then you’re probably best either contacting your phone operator or visiting an Apple Store. But hopefully it will fix it!

Bonus News – Visual Voicemail coming to EE:

A bonus bit of news I discovered whilst I was googling for a solution is that apparently EE (according to their Twitter account) are going to add visual voicemail to their service in the new year, so Orange and T-Mobile customers should hopefully get that on their iPhones in future.

Why the next iPhone won’t be called ‘iPhone 5’…

I’ve been getting more and more bugged by people referring to the next iPhone as being the "iPhone 5", so I thought I’d make this simple graphic to explain why numerically it makes no sense for the next iPhone to be referred to as number 5!

You can download a 300dpi A4 sized version from this link if you want to print your own out and annoy inform any of your co-workers / friends / family / bloggers / podcasters when they start saying "what will the iPhone 5 be like?"…

Dis-N-Gaged

Almost exactly seven years ago, before the launch of Apple’s iPhone and the ubiquity of the App Store, Nokia launched the N-Gage. The N-Gage was a combination mobile phone and gaming device that was intended to take on Nintendo’s Game Boy Advance.

The N-Gage (mk1 pictured below) was pretty much the first gaming phone and should really be considered a failed yet bold attempt to kick-start what is now a huge multi-billion dollar business globally. The N-Gage didn’t get the kind of success Nokia really hoped for despite the many millions invested in marketing. I actually liked this phone and did happily use it as both a phone and gaming device, although admittedly the main game I played was Tony Hawk’s Pro Skater! Combining a gadget with skateboarding is a sure way to catch my eye.

Sidetalkin’

The most obvious quirk of the phone’s design was that you had to hold the thin edge of it to your head to make calls, so it looked pretty comical! (Check out http://sidetalking.com/ !) Nokia subsequently brought out the ‘N-Gage QD’ which removed the side-talking feature and added a backlight and made it a bit smaller, as well as putting the game card slot on the outside instead of inside behind the battery!

The demise of the N-Gage started back in 2005 when the N-Gage as a hardware device ceased production leaving only N-Gage as a software component on various Nokia devices. However, September last year marked the final nail in the coffin (N-Gage 2003-2009: An Obituary) of the N-Gage when it was finished off completely.

As quirky as it looked, I think the N-Gage was an interesting concept which was ahead of its time – location-based multi-player networked gaming via bluetooth or over the internet via mobile-phone networks? Back in 2003? Who would ever be able to afford the data fees that the carriers would have charged you back then?!! Nokia spent a lot of money trying to make it a success, but the timing just wasn’t right for a device with those capabilities.

Nokia are really up against the wall these days with Apple’s iOS platform and the Android platform pushing the bar in both hardware and software capabilities. Although I’m a hardcore iPhone user I used to be a very happy Nokia user, the Symbian S60 OS integrated pretty well with my Mac. Once I got an iPhone of course that all ended, but I’ve still enjoyed using my various Nokia handsets such as the N80 and N95.

Pushin’ the envelope

Nokia do seem to be trying to find their feet in this changing mobile device landscape, certainly the Nokia N8 device has some great features, especially the 12MP camera which seems to produce some pretty spectacular photography.

Innovation like Nokia’s Push project also seems to demonstrate some of the same pioneering spirit behind the N-Gage, breaking new ground by exploring the use of mobile devices as part of our physical activities – of particular interest to me are the skateboarding and snowboarding prototypes (as I said earlier, a sure way to get me interested is to combine gadgets with skateboarding!).

I’m looking forward to seeing what comes out of these initiatives (I’d like to get my hands on either the skate or snow prototypes to play around with them!). For now I’ll just end with saying farewell to the Nokia N-Gage!

Review: ‘You Gotta See This!’

"You Gotta See This!" is a photography app by Boinx software for the new iPhone 4 which makes use of the gyroscope feature to quickly capture panographic images.

It’s a pretty fun app to use to capture some unusual images. You just press the button and it starts to record images as you move around the scene you’re trying to take photos of and then it overlays all the captured images rendered as one big image which can rendered using several themes.

You can then post these themes to Facebook, Twitter etc and save them to the camera roll on the iPhone.

if you’ve got an iPhone 4 it’s a cheap (£1.19) little app that makes use of the new hardware features offered by the iPhone 4. Here’s a few more sample images made using it: