Tip: Setting up a Minolta PagePro 9100 printer under Snow Leopard

Mac OSX 10.6 brought quite a few new but subtle features and changes, one of those subtle changes was the dropping of support for the AppleTalk protocol. Many people who upgraded to Snow Leopard (or newer versions of OSX) got caught out and suddenly found themselves with a non-functioning printer.

I was aware of this change but even so I found myself in the same position, and despite all the various articles and posts I read I couldn’t get my Konica Minolta PagePro 9100 printer working. I resorted to sharing my printer via an old iMac that was running OSX 10.4 and printing that way, it worked but would take a long time to print a single page and frequently had to be rebooted to keep it working.

After running like that for a few months I decided to try and figure out how to get the PagePro 9100 working directly again as I couldn’t handle using the same slow process any more. Amazingly I managed to find a Konica Minolta setup guide and it actually worked! So here’s the process:

Configuring a PagePro 9100 printer under Snow Leopard

I followed instructions in an old Konica Minolta support PDF document that you can download from the Konica Minolta site, unfortunately their site is rubbish and doesn’t let you link to files easily so here’s a link to download it:

http://dl.dropbox.com/u/18567/Crown-MacOS10_3-installation.pdf

Note: Before you start you’ll need to know your printers IP address, the PagePro 9100 can be set to have a fixed IP address but this wasn’t needed when printing using AppleTalk so yours may not be set up with one. You’ll need to get that changed using the printer’s controls on the top. You really need to get this sorted out before you can proceed any further. Update: See end of article for help with IP address settings on your printer !

Ok, here’s the simple setup process:

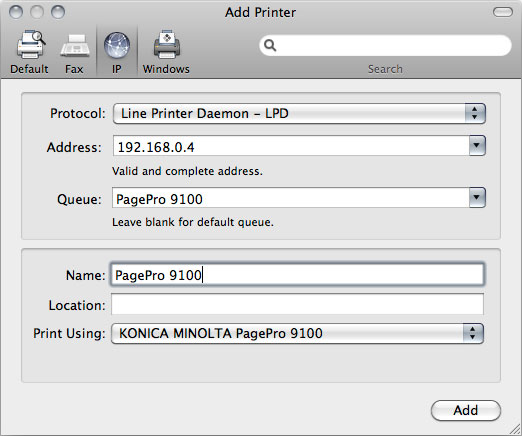
  • You need to set the printer up using the IP printing method, you’ll see a blue circular globe icon in the Add Printer dialog so click that option.
  • Use the Line Printer Daemon option under the ‘Protocol’ drop down.
  • Enter the fixed IP address of your printer into the ‘Address’ field.
  • Enter a queue name in the ‘Queue’ field (I used PagePro 9100).
  • The ‘Name’ field will probably have taken the IP address automatically but this can be changed to PagePro 9100 too.
  • Select the ‘Select Printer Software’ in the ‘Print Using’ dropdown at the bottom. You should be able to find the Konica Minolta PagePro 9100 PPD file in the list. Choose that from the list.

Set the appropriate trays / bins etc for your printer etc and then that should be you set up hopefully!

Addendum: Configuring the IP address settings on the PagePro 9100

In response to a request for help in the comments below I’ve added some instructions on how to configure the IP address settings on the PagePro 9100. Configuring the settings is a bit of a pain due to the tiny little single-line display on the printer, but hopefully these instructions will help!

You need to make sure the printer is not getting a dynamic IP address via DHCP, so you need to disable DHCP on the printer. Once that is switched off you can then set the fixed IP Address that is required in order to set it as per the instruction in this article.

To get to the settings to do this press the green ‘Online’ button on the printer controls to put the printer into Offline mode, then use the ‘Select’ / ‘Next’ / ‘Previous’ buttons to move through and select options.

You need to drill down to the following settings:

Menu -> Administration -> Communications -> Optional NIC -> Crownnet -> TCP/IP

Now that you are in the TCP/IP options you need to disable DHCP, select ‘DHCP’ from the available options (there are quite a few to choose from, just keep clicking through using the Next/Previous buttons), set this to ‘#disabled’ and then click the ‘Menu’ button once to move back up one level.

You now need to set the fixed IP address, you should be back up one level with ‘DHCP’ showing in the screen. Click next a few times and select ‘Internet Address’, you should now be able to enter all the digits of your IP address. Please note that you need to include 3 digits for all four parts of the address, so rather than just ‘192.168.0.4’ you need to enter ‘192.168.000.004’.

Make sure to use whatever IP address range your network runs on, routers use various different ranges so you need to set an IP address that is appropriate for your network’s range.

Addendum #2: Get default page size on PagePro 9100 to be A4 instead of ‘Other’

If you’re using the PagePro in the UK or at least with UK region settings in order to print to A4 paper then you may find that whenever you print that the printer always uses a default page size of ‘Other’ instead of A4. Although this actually prints to A4 correctly it always bothered me that it showed this way, so I decided to figure out what the problem was.

After a bit of looking around in the PagePro 9100 OSX EN.PPD file I found all the entries relating to A4, in PPD files the dimensions of paper sizes are configured using a dimension called points, basically there are 72 points to an inch. In the case of A4 in this PPD the dimensions used are 596 by 842, however, A4 is a metric-based page size of 297mm by 210mm so I checked out what these convert to in points.

It turns out that the PPD rounds all of the page dimensions to the nearest point, so I then edited the PagePro’s PPD file to use the accurate point dimensions for A4 which are 595.28 by 841.89 (you need to replace it in a few locations in the file). I then re-setup the printer with the updated PPD and it now uses A4 as the default page size once more! It seems that OSX 10.6 is fussier about the specific page dimensions than OSX 10.5 was, but this tweak sorts it out. I’m sure you could modify the PPD for any other paper format that you wanted to use, just google the correct point dimensions for your page size and the update it in the file.

Here’s a link to an already modified PagePro 9100 PPD file with updated A4 dimensions to save you having to tweak it yourself.

Addendum #3: OSX 10.7, 10.8, 10.9, 10.10, 10.11, 10.12

These instructions will basically work for all version of OSX since Snow Leopard, so 10.7 Lion, 10.8 Mountain Lion, 10.9 Mavericks, 10.10 Yosemite, 10.11 El Capitan definitely all work and 10.12 Sierra should be fine too as the protocols used are the same.

Tip: Use a symbolic link to force Mail.app downloads into the main Downloads folder in Mac OSX (Updated for OSX 10.8 Mountain Lion)

TIP UPDATED FOR Mac OSX 10.8 Mountain Lion! – Mac OSX 10.5 introduced a setting in Mail.app Preferences to set where email attachments are downloaded to when you open them or when images are loaded in HTML emails. If you’ve never looked in the default ‘Mail Downloads’ folder you might just get a surprise as to how much junk is actually in there as it’s not obvious that these files are building up!

It is possible to change the location for these downloads so that it is in a more obvious location, but I found that even when setting an alternative to the default ‘~/Library/Mail Downloads’ folder, such as the main ‘Downloads’ folder, that these attachments would still download in the default ‘Mail Downloads’ location. The solution to this problem was to delete the ‘Mail Downloads’ folder and create a symbolic link to my preferred ‘Downloads’ folder.

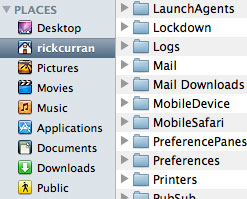
To do this you need to navigate to the ‘Mail Downloads’ folder which you’ll find in your user account folder (the folder with your name and the Home icon), then go into the ‘Library’ folder and you should see the ‘Mail Downloads’ folder. Note: Since OSX 10.7 Lion came out the ‘Library’ folder is hidden by default, to get to it you need to access the ‘Go’ menu in the Finder whilst holding down the alt key.

Next step is to delete this folder and then fire up Terminal on your system – this bit requires a bit of command line entry but it’s fairly straight forward. When you open up Terminal you should end up with a login prompt and you will be located within your user account files on the system, presuming this is the case we can get on with creating the symbolic link!

In the example below I am going to create a symbolic link to the main ‘Downloads’ folder that is used by Safari so that all downloads from either web browsing or email will end up in the same place:

ln -s ~/Downloads "library/Mail Downloads"

If all has gone well you should now find that any attachments you open from emails will now appear in your regular downloads folder instead of the hidden away Mail Downloads folder!

UPDATE: OSX 10.8 Mountain Lion changes the location of the Mail Downloads folder

In OSX 10.8 the “Mail Downloads” folder location has moved to the following location (See this MacOSXHints article for more details):

~/Library/Containers/com.apple.mail/Data/Library/

To apply the above link for OSX 10.8 you will need to use the a different command to create the symbolic link. The first step is to go to the new folder location, I’d recommend doing this via the terminal as you need to run the command from there, go to: ~/Library/Containers/com.apple.mail/Data/Library and delete the existing ‘Mail Downloads’ folder that is in there. Then use the following command to create the symbolic link in this new location:

ln -s ~/Downloads "Mail Downloads"

Once that’s done all your attachments in OSX 10.8 Mountain Lion should now end up in your Downloads folder allowing you to easily keep track of attachment files and avoid them unnecessarily clogging up your hard drive.

Five Subversion Clients for Mac OSX

Until fairly recently if you were a Mac user and you wanted to use a version control system like Subversion you didn’t have much choice as far as client apps went. If you didn’t have the terminal skills to work via the command line and wanted use something with a nice GUI then you had to choose from apps that were either incomplete or not particularly Mac-like.

However, the latter half of 2008 brought a lot of change in regards to Subversion client apps for OSX. It’s kind of like with buses, if you wait long enough several of them come along at once ;)

Subversion clients from A (Adobe Dreamweaver) to Z (ZigVersion)

To give the various apps available thorough overviews is beyond the scope of this article, so I’m just going to list the various apps that are available and point out some of their features.

Adobe Dreamweaver CS4

Dreamweaver CS4 added support for the Subversion version control system, something I’ve long thought would be a great feature and one which via an extension was available to Windows users. However, I don’t think the implementation of it in Dreamweaver CS4 is as good as it could be.

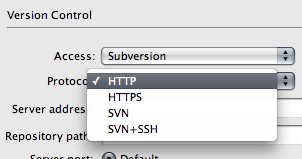
One issue in particular is that the commands for Checking out and committing to a repository are the same as those used for the regular Checkin / Checkout functions of Dreamweaver which I think is a bit confusing as they are very different features. Using these terms is a problem as they don’t match up with the correct terminology used in Subversion. Dreamweaver is often the first app (rightly or wrongly) that people who are learning how to make websites use so there’s a bit of a responsibility for it to teach people correctly and to encourage good habits.

I consider Dreamweaver CS4’s SVN integration to be a good first step but it could do with improvement to make it more usable. Unless you use Dreamweaver already then you’re probably not going to start doing so just to get access to its Subversion integration. But if you’re already a Dreamweaver user then it does offer some useful functionality, and if you’re a DW user but have never used version control then it’s a good enough place to start!

Dreamweaver CS4 costs $399 for a commercial licence but there are also educational licences and there is also a 30 day trial.

Go to the Dreamweaver CS4 website

ZigVersion

When I first started using Subversion ZigVersion was the best solution for OSX that I tried. It was the most user friendly / easy to use out of all the clients available at the time such as SVNX, Syncro SVN and SCPlugin. I’ve always used a hosted Subversion repository ever since I started using Subversion so I was needing an application that would allow me to easily connect to an external server. ZigVersion made it pretty easy to do that, and to an SVN noob it was fairly easy to understand what was going on.

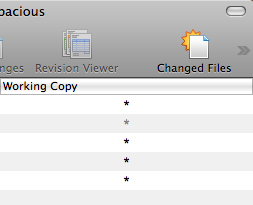
Once connecting to my SVN repository it was quite easy to create a working copy and update it from the repository files. After working on files it was easy to find the updated files with a simple click on the ‘Changed Files’ icon in the menubar. Only the new or updated files would be shown which could then be selected and checked in to the repository with appropriate comments added at the same time. It was also easy to get access to revisions of files via the ‘Revision Viewer’ button.

It’s a pretty straight forward application and does the job, one criticism would be that the interface is fairly unexciting in appearance. I mainly say that as this is a review of Mac OSX Subversion GUI apps so the visual appearance is important and the main reason why I’m not including SVNX or Syncro SVN amongst these applications.

ZigVersion costs $99 for a commercial licence but is free for non-commercial use. There is also a 30 day trial period.

Go to the ZigVersion website (Zigversion no longer appears to be available)

Versions

We’re now getting into the mac-daddy territory of Mac OSX Subversion apps. Versions was the first of the new wave of Mac SVN apps, despite showing as "coming soon" for over a year and feared by many to be vapourware.

However, although it was delayed the app was launched and it delivered on its promise of providing a much more Mac-like app for dealing with Subversion repositories and the tasks involved with working with them.

Versions’ main tool bar provides buttons for Update, Commit, Checkout and other options, just under the main toolbar there are three tabs, Timeline, Browse and Transcript. The Timeline tab gives you a timeline in the form of a list of revisions and accompanying notes which makes it easy to view the changes made over a period of time. The Browse tab allows you to view the repository files and view history of individual files as well as comparing, managing blame and also a Quick Look option for quickly viewing the contents of files.

There is a quick setup button that will get you setup with an account at Beanstalkapp.com who provide online SVN repository hosting, there’s a free account offering one repository to get you started with various tiered pricing options after that.

Versions deserves credit for really raising the bar for Mac SVN apps, the teaser page had me longing for months for them to launch the app! Although in the end I had give up waiting and buy ZigVersion instead in order to get some kind of GUI access to my repository.

Versions costs €39 (approx $50) for single user licence, there is a 21 day trial period.

Go to the Versions website

Cornerstone

This is the Subversion app I’ve been using the most out of all of them recently, although it’s a pretty close race between it and Versions. Cornerstones’ interface is well thought out and well designed and by that I don’t mean just good looks but that it provides a great feature set for working with multiple SVN repositories.

You can easily filter the working copy files in different states such as Changed, Modified, Conflicted, Unversioned and Locked. The ability to filter files this way is an essential feature in an SVN app, finding changed files in order to commit them to the repository is one of the most things I do.

Cornerstone also offers a great horizontal timeline view that displays the various revisions which is great for quickly reviewing the details of each revision such as dates, times, Revision notes and changes made.

Cornerstone costs $59 for a single user licence but you can use a trial version for 14 days to check it out.

Go to the Cornerstone website / → Buy Cornerstone from the Mac App Store

Coda

Coda is a text-editor for web development, its main strength being the integration of several aspects of the common web development workflow: text editor, FTP, CSS editing and Terminal. In a recent update the application now has integrated Subversion support which adds it to this growing list of OSX Subversion clients.

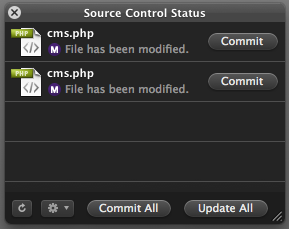
Coda’s SVN integration adds a simple source control status window that quickly highlights changed files making it easy to find updated files and commit them to the repository. There is also easy access to a Source Control menu option offering committing / discarding changes, refreshing, comparing and updating the repository.

It is smoothly integrated into the workflow of Coda and rounds out the feature set of the application and it’s aim to provide a one-window web development environment.

Coda costs $99 for single user licence, there’s a 30 day trial period.

Go to the Coda website

Closing – Rise of Git

Ironically as all of these Subversion apps start to appear many people are starting to switch to using Git instead of SVN! There are a couple of Mac GUI apps for Git available so far such as GitX and Gitnub so check them out if Git is more your thing.

Update: Couple of new Subversion / Git apps on the Mac App Store

If you’re using Beanstalk for Subversion / Git hosting you might want to check out the app Magic Bean for Mac too. There’s also an app called SourceTree which supports Git and Mercurial and also has some support for Subversion. I haven’t tried either app yet but worth a look I think.

FlamingoHD – Helping you manage your AVCHD media

FlamingoHD is a new application by Shedworx (the guys that make VoltaicHD), with the purpose of helping you manage all of your AVCHD video footage. Although AVCHD has greater than ever support these days it still presents a challenge when it comes to managing all of the video that you’ve shot, especially as the convenience of shooting straight to disk or card kind of encourages you to record a lot more than you would when using tape!

FlamingoHD provides a solution to this problem by enabling direct import from your AVCHD camera or alternatively importing AVCHD clips that are already on your hard disk. It does this by providing a preview thumbnail of the video footage before you import it, this saves a lot of time compared to iMovie or Final Cut Pro as you can choose only the clips you want without having to convert the footage first.

The user interface is easy to understand as it features a left hand menu very similar to iPhoto or iTunes which contains sections for Devices, Events and Projects, very similar to the iLife applications.

Importing AVCHD footage into FlamingoHD:

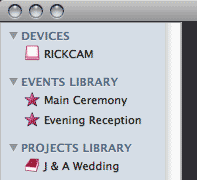
The basic process is to select the source of your video footage. You can either connect your camera to your computer which will automatically show up in FlamingoHD as a device, or you can select ‘Import Media’ from the File menu to select either a single clip or a folder containing clips from a location on your hard disk, once selected they will show as a device in the ‘Devices’ section in the left hand menu. It’s also worth clarifying that FlamingoHD will actually import video, audio and images from your source device or location and can manage all of these assets within Events and Projects.

Setting Preferences and Creating Events:

With a device selected ready for import you can then choose which clips you want to import into FlamingoHD, the imported files will automatically become an Event, or more than one Event if there are multiple clips shot on more than one day. This can be controlled by a preference which allows you to switch off this feature if you just want to import everything into one event.

The application preferences are worth checking out as there are a couple of other important preferences to consider. The first is ‘Hide media already imported’ which is enabled by default, this is useful when there are a lot of clips on a camera that you have already imported as it hides the ones you’ve already brought in.

The second important preference is ‘Copy imported media to Library area’, it’s important to set this appropriately because if it is ticked any clips imported from a folder on your computer will be copied to FlamingoHD’s Library which will take up more space and will result in duplicate files. Clips imported directly from a camera will be copied to the library regardless of this setting, the location of the Library for FlamingoHD can be set in the Base Location preference under the General tab.

Creating Projects:

Once you’ve imported clips into FlamingoHD you can then group clips together into Projects, these projects can then be sent to exported in via several methods, either ready for editing or as final output.

Projects are created by selecting ‘New Project…’ from the File menu, this adds an entry under the Projects section of the left hand menu which you can name to suit. Once the Project has been created you can drag and drop clips from any of the events that you previously created.

Exporting / Converting Projects:

After creating a project you can then choose to export or convert your files. FlamingoHD has options to send files to VoltaicHD, RevolverHD, iMovie and also to the assets folder of other editing applications such as Final Cut Express or Final Cut Pro.

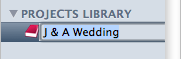
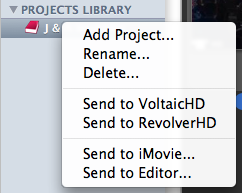
You can export by either right-clicking on the Project name or by selecting the Project and clicking on the ‘Media’ option from the main menu. The four options at the bottom of the menu allow you several choices for your project:

Send to VoltaicHD
This option will send your footage to VoltaicHD and it will be queued up and converted ready for use in whatever application you want.

Send to RevolverHD
Selecting this option will send your AVCHD files to RevolverHD where they can be burned as either AVCHD DVD or Blu-ray DVDs that can be played back on Blu-ray players such as the Playstation 3.

Send to iMovie…
This option is specifically for sending your project to iMovie, it creates a new project in iMovie and sends your clips to VoltaicHD for conversion, once converted you can open iMovie and all of the clips will be there in the new project.

Send to Editor…
Using this option will send files to a folder in the assets location of your preferred editing software, you can set this option in the Preferences of FlamingoHD. The AVCHD clips will be converted in VoltaicHD and copied to the folder. You can then open your editing software and bring in the files that are ready for editing.

In Beta and available now!

FlamingoHD has worked pretty well for me so far but it is worth pointing out that (at the time of writing) that it is a 0.1 version, as such it’s beta software and still being actively developed. However, the developers Shedworx have made it available to purchase now for the reduced price of $29.99 while it is in beta, the price will increase after the beta period.

FlamingoHD already provides a very useful application for managing all of your AVCHD media, but one aspect I haven’t mentioned is that it will also handle any video format that is supported by Quicktime so it can also be used for cameras that don’t use AVCHD as the video format. For me this is the key to the application’s potential, it fulfils a function that Apple’s own iLife suite doesn’t provide, that of being a specific video asset management tool.

The only criticism I can see is that it currently doesn’t provide direct playback of the video clips that are imported into it, instead the files are opened into Quicktime player. The biggest drawback of this being that Quicktime player doesn’t currently support AVCHD clips. However, Apple’s next release of Mac OS X, 10.6 ‘Snow Leopard’, is supposed to support AVCHD so that will be one solution, but in the meantime perhaps enabling AVCHD clips to open in the open source VLC player could be integrated as this already provides playback of AVCHD footage. The next release version 0.2 will provide a film-strip view of clips which will at least make it easier to examine the clips in more detail without needing to open them.

Give it a try for yourself, there’s a demo version that is limited to a maximum of 2 events, 2 projects and 50 clips, this gives you enough to try it out and kick the tyres. There are also demo versions of VoltaicHD and RevolverHD so you can test out the whole workflow. Finally, don’t forget to give feedback to the developers via the FlamingoHD contact form, they’re keen to consider people’s ideas and to hear about any issues people encounter with the software.

Budget AVCHD editing in Windows: VoltaicHD for PC and Windows Movie Maker!

I’ve previously written about How to edit AVCHD footage on Mac OSX, at the time of writing that article there weren’t many options for editing AVCHD footage on either Mac OSX or Windows operating systems. VoltaicHD is a great application that helped Mac OSX users in particular because at that time there was no way of editing AVCHD on Mac at all.

Many Mac users had purchased AVCHD cameras and were frustrated by the complete lack of software available for editing AVCHD on Mac and even Windows users had to wait quite a few months before Sony released a version of their Vegas software that supported AVCHD.

Since then though, there are quite a few options for Mac users: Final Cut Studio and Final Cut Express offered mid to high end products for the Mac platform. Also Apple’s own iMovie software had a complete revamp and amongst many new features was direct support for AVCHD based cameras, a perfect budget solution as the software was included free with any new Mac or as part of Apple’s iLife suite for about £55 / $79.

However for Windows users, despite the availability of software like Sony Vegas, many people wanted a way to edit AVCHD without having to buy editing software that cost as much (or more!) than they spent on their cameras in the first place! There was no easy way to do this on a low budget, you could find articles on the web with instructions on how to use various applications or utilities to convert the AVCHD files into various formats, but nothing simple that would allow non-technical users to edit AVCHD footage. But now there is an easy solution.

VoltaicHD for PC & Windows Movie Maker: A low budget way to edit AVCHD!

The company that produced the VoltaicHD application for Mac OSX, Shedworx, has released a Windows version of VoltaicHD that is compatible with both Windows XP and Vista. You can convert your AVCHD footage into WMV or AVI format video which can then be used with Windows Movie Maker or other video editing application for Windows.

Windows Movie Maker is a video editing package that comes with both XP and Vista, and contrary to popular belief it is actually capable of working with HD video footage, but just not with native AVCHD footage. That’s where VoltaicHD fits in, by converting the footage to WMV format you can edit the footage from your HD video camera using just Windows Movie Maker!

Tips for converting / editing AVCHD with Voltaic and Windows Movie Maker

There are a few minimum system requirements to run VoltaicHD for PC but any reasonably modern PC should be capable of processing the AVCHD files. It’s worth noting of course that HD video is very intensive to work with and requires greater resources than editing conventional standard definition video footage. On a system with the minimum hardware requirements (as detailed below) it will take about 2 minutes to convert a 10 second AVCHD clip. It is obviously recommended to have as powerful a system as you can manage but even a slightly older machine should be capable of producing results – as long as you have a little patience and perspective! On the plus side the converted video files result in uncompressed HD video which can be played back more easily than the original AVCHD files on the minimum hardware spec machine.

Minimum Hardware requirements: At least 1GB of RAM, at least a 2Ghz P4 processor or equivalent processor and as much hard disk space as possible. AVCHD footage uses about 120Mb per minute of video footage, once this footage has been processed it uses about 500Mb per minute of video, so disk space is quickly used up.

Minimum Software requirements: Either Windows XP SP2+ or Vista, Microsoft Movie Maker 2.1+ and Windows Media Player v11+.

VoltaicHD can convert AVCHD footage to either WMV or AVI formats, however WMV is the preferred format as it keeps the aspect ratio correct no matter the resolution of your source AVCHD footage. There is no loss in picture quality when converting the AVCHD footage to either WMV or AVI. However, the audio track is affected during conversion, AVCHD can use Dolby 5.1 surround sound but only Sony cameras use this, Panasonic, Canon and JVC use stereo only. Any Dolby 5.1 sound is dropped back to stereo audio as this is all that Window Movie Maker supports.

Converting files using VoltaicHD for PC

You need set up the various preferences before using VoltaicHD for the first time, you can go back and change these preferences later by going to the Tools->Options menu option, or via the toolbar button.

  • Scratch file location: VoltaicHD creates temporary files during conversion, you can set where these should be created to a location of your choice. If you are converting large files from an external storage location, and want to preserve disk space on the machine running the conversions, you should set this location to be on the external storage device.
  • Output Directory: You can set where the final converted final files will be placed.
  • Extract 5.1ch Audio: The audio track from your movie can be extracted during the conversion process.
  • Output Format: WMV format is the recommended format for your converted clips.

Once you’ve got VoltaicHD installed on your system and Preferences all set up you are ready to go. Although it’s worth keeping in mind some suggestions for converting your AVCHD clips:

  • Make sure to copy all clips from your camera onto your hard drive before converting. It’s not worth risking trying to convert footage straight from your camera as it can be problematic.
  • Keep a VoltaicHD shortcut on your Desktop, this makes it easy to just drag AVCHD clips onto it ready for conversion, or just to open up the application ;)
  • Try closing down any unnecessary programs during the conversion process. Converting AVCHD footage is very processor / memory intensive so freeing up resources on your computer helps a lot.
  • Watch out when converting large AVCHD files if using a FAT32 formatted drive as the converted files may result in files larger than the 2Gb limitation of FAT32 will allow.

Next, add some AVCHD files to the file list and press Start. The converted files are created in the same directory as the source files by default, or to the location you set in your Preferences.

Setting up and editing in Windows Movie Maker

You need to set up Movie Maker to the correct video format for your region, either PAL or NTSC, and also to widescreen (16:9). Go to Tools->Options and click on the Advanced tab. You should then see a section called Video properties where you can set the correct format (NTSC or PAL) and also the Aspect ratio to 16:9. There’s no need to set the video format (NTSC or PAL) in VoltaicHD as this is auto-detected from the AVCHD clip.

You can now edit your HD footage just like you would with any other footage in Windows Movie Maker.

Exporting from Windows Movie Maker

VoltaicHD provides an export profile for Movie Maker 2.1 on Windows XP which ensures that the full HD resolution of your completed movie can be exported.

To Export from Movie Maker, select the File->Save Movie menu option. This starts the Save Movie Wizard. Use the following settings:

  • Movie Location: My Computer
  • Choose a name for your exported movie
  • Movie Setting: select Other, then VoltaicHD 1080 from the drop down.
  • Note: Select VoltaicHD 1080 PAL or NTSC, based on the format you are using.

If you are using Movie Maker in Windows Vista, then VoltaicHD provides an export profile to ensure that the full HD resolution of your completed movie can be exported. If your movies are in 1440×1080 resolution you will also need to manually apply an Effect to your clips to retain the full 16:9 aspect or Widescreen mode. Once your clips are in your storyboard or timeline, right click each of the clips and select “Effect”. On the next window under “Available Effects” scroll down and click on “VoltaicHD Widescreen” then select “Add >>". Then select OK. The preview window should now be showing your clip in widescreen mode.

To Export from Movie Maker, select the File->Publish Movie menu option. This starts the Save Movie Wizard. Use the following settings:

  • Movie Location: My Computer
  • Choose a name for your exported movie
  • Movie Setting: select Other, then VoltaicHD 1080 from the drop down.
  • Note: Select VoltaicHD 1080 PAL or NTSC, based on the format you are using.

Movie Maker will then create your HD movie! All thanks to VoltaicHD for PC!

Playing back your HD footage

If you want to watch your HD footage on something other than your PC then you can watch on XBox, PS3 or any Blu-ray player. You’ll need something like Nero to burn a blu-ray DVD (AVCREC format).

The makers of VoltaicHD for PC make some software called RevolverHD which can create blu-ray compatible DVDs. However, there’s currently only a Mac version available, so if you happen to have access to a Mac then you can use that. If you’d like a PC version of RevolverHD then get in touch with the guys at Shedworx and let them know.

Happy editing :)

Update – VoltaicHD 2 released in October 2009

Shedworx have released version 2 of VoltaicHD adding new features such as preview of AVCHD / AVCHD Lite clips, native editing of AVCHD video and the ability to upload video to YouTube. I’ve written a post with an overview of VoltaicHD 2.

Burn Blu-ray compatible and AVCHD DVDs using RevolverHD for Mac

You’ve got a spanky new HD TV, you’ve been editing your HD footage on your Mac. But how do you get your HD footage on it without buying a blu-ray burner and a blu-ray player?

The answer: Burn Blu-ray compatible DVDs using RevolverHD for Mac OSX and play your HD footage from a regular DVD disc.

RevolverHD for Mac – Make blu-ray DVDs

RevolverHD (another product from the makers of VoltaicHD) which helps you play your edited HD footage from iMovie08 / iMovieHD / Final Cut Express on the Playstation3. It can also create Blu-ray compatible AVCHD DVDs using the unedited AVCHD clips directly from your camera.

You can download the demo version which will give you 3 test exports or burns. There’s an easy to follow user guide which will take you step by step through the process for iMovie08, iMovieHD and Final Cut Express.

Make blue-ray DVDs, even on non-Intel Macs

Like it’s companion product VoltaicHD, RevolverHD will work on both Intel and PowerPC Macs on both OSX 10.4 and 10.5 which is good news if you’ve got an older Mac without an Intel processor. Don’t forget though that the conversion process used by RevolverHD is pretty intensive so using your old G3 iMac isn’t going to be very fast, although it should be possible!

It’s also worth noting that AVCHD DVDs may not work on some blu-ray players, check out the RevolverHD FAQ for more details.

I’ve done some test discs which have successfully played back on a friend’s Playstation 3 so it certainly seems to do the job!

Configuring Apache 2 with Virtual Hosts on Mac OSX Leopard

I recently installed Leopard on my development machine by doing a completely fresh install in order to have a clean system. One thing I found that I couldn’t get running correctly was recreating my preferred Apache web server setup including Virtual Host configuration. Leopard runs Apache 2 by default but I had been running this on Tiger anyway rather than the default Apache 1.3.

Problem #1: Access denied using custom DocumentRoot

My first problem was that I like to use a different location for the DocumentRoot configuration, I keep my site files in ‘Users/rickcurran/Documents/Client_Data’ located in my Documents folder in my user account rather than in the default ‘Library/Webserver/Documents’ location. The problem I encountered was that if I changed the DocumentRoot to point to my preferred location I got a ‘Forbidden – You don’t have permission to access / on this server’ message. I tried to get it working and just gave up for a while and used the standalone MAMP application in the mean time to get working because this had no problem pointing to my custom DocumentRoot location.

Solution to #1: Change the user that Apache webserver runs as

I eventually figured out that in Leopard Apache’s default user (www) doesn’t have permissions to access my Documents folder. I simply went and changed the User and Group settings in the httpd.conf file to use my user and group and then it worked fine. I’m sure you could probably add the default Apache user to a group or some other Users / Groups / Permissions setting but for a development machine this solution works fine!

Problem #2: An alternative to name-based virtual hosts avoiding netinfo / hosts files

I like to have all my sites both current and past projects running locally so that I can fix any bugs etc without having to work on live sites. Apache’s Virtual Host configuration is perfect for the job. At first under leopard I just couldn’t get them to work but I realised that I’d simply missed something out in the configuration, so it was more a human error really. However whilst Googling trying to figure out what I’d done wrong it reminded me that most tutorials on configuring Virtual Hosts under Apache do so by using name-based hosts which require you to edit the ‘/etc/hosts’ file (or via Netinfo Manager on Tiger).

The drawback to this technique is that the sites are only viewable on your development machine, if other users on your network want to view the development sites they need to configure their own hosts file. This is a problem when you’ve got several machines that need to access the sites.

Solution to #2: Port based virtual hosts

To get around the hassle of Netinfo / hosts configuration I use an alternative virtual hosts setting which uses a different port for each site and can be accessed on any machine on the network.

To set up port based virtual hosts you need to first uncomment a line in the main httpd.conf to enable virtual hosts in the first place. Next edit the ‘httpd-vhosts.conf’ file found in ‘/etc/apache2/extra/httpd-vhosts.conf’, comment out the example virtual hosts that are there by default and then add your virtual hosts in the following way:

<VirtualHost *:80
DocumentRoot "/Users/rickcurran/Documents/Client_Data/intranet"
</VirtualHost>

Listen 8081
<VirtualHost *:8081>
DocumentRoot "/Users/rickcurran/Documents/Client_Data/myexamplesite_co_uk"
ServerName 192.168.0.2:8081
</VirtualHost>

The first sets a default virtual host on port 80, the second sets up a site on port 8081. The examples above are very basic configurations, you could add support for error logs etc but this gets them up and running.

Restart Apache by unchecking and rechecking the Web Sharing tickbox in the Sharing System Preference you should then be able to access the ‘myexamplesite_co_uk’ site by using the URL ‘http://localhost:8081’. Also anybody else on the network can access the site too without messing around with the ‘etc/hosts’ file!

Scared to edit httpd.conf etc? Try HeadDress VirtualHostX

Update: It seems as if HeadDress is no more, the website has been down for ages so I’ve updated this section to refer to another app called VirtualHostX. If you don’t like editing config files via the Terminal then there’s a nice application called HeadDress VirtualHostX that gives a nice user interface for the whole process of setting up Virtual Hosts. VirtualHostX allows you to create sites running on their own local domain name by editing your /etc/hosts/ file, you can also specify a specific port for the site too.

I still prefer using my own method #2 above as it allows multiple users on your local network to view your sites as well, whereas with VirtualHostX you’d need everyone to edit their /etc/hosts/ file. For single machine web development it’s a great application and costs only $9.00 for a licence.

One more reason why there is no Flash Player on the iPhone – H.264 support in Flash Player 9

Adobe announced today support for the H.264 video codec in an update to their Flash Player 9 software. No longer will it be necessary to encode video files specifically using their FLV video format in order to allow playback of video using the Flash Player, which is pretty awesome news really. It will of course rely on people upgrading to the latest version of Flash Player 9 but as most people receive this via auto-update this should be reasonably fast.

Apart from the benefit of using an open standard for video it does also bring higher quality video, specifically HD format video into the realm of Flash Player. The only other mainstream way of playing H.264 video in a web browser is via Apple’s Quicktime player, soon Flash will allow you to play those same files without requiring Quicktime as a download.

Maybe that’s why there’s no Flash Player on the iPhone?

When the iPhone launched recently the ‘great ommission’ as some saw it (apart from copy and paste!) was that there was no Flash Player support in the iPhone’s Safari browser. A few different theories have abounded as to why this is, one of the main theories being the impact the Flash player would have on the iPhone’s battery life, this is probably quite true and Apple’s own Quicktime framework is undoubtedly optimised better for playback on the iPhone. Another reason was that YouTube, probably the largest provider of Flash video format files, have their own application on the iPhone. This YouTube application actually plays video that has been re-rendered into H.264 instead of the Flash FLV format, thereby doing away with one of the reasons for FLV support in Safari.

The addition of H.264 support to the Flash Player means that this same YouTube footage as used by the iPhone could now be played in the Flash Player too. It’s quite likely that Apple would have knowledge that Adobe were working on H.264 support in the Flash player and this made it even less essential to include Flash Player.

A win-win-win-win situation for Apple, Adobe, YouTube and Us (the content consumer)

This does of course still leave the many interactive Flash content providers out in the cold but as Flash has become so ubiquitous in regards to video playback then I think this still represents a great win-win for both Apple and Adobe, and I guess YouTube too really. If content creators choose to use the open standard of H.264 for video instead of the FLV format then any Mac, PC or iPhone user using Quicktime to play movies can view the content, as can anyone using the new Flash Player. This does appear to represent a good move towards open standards, it will take time for the new Flash Player to get more widespread support so I don’t think FLV format will go away anytime soon, but it is a step forward at least.

One win-lose aspect though – Flash Media Server for streaming H.264 only

There is only one negative aspect of the Flash Player support of H.264, and that is streaming support of H.264 will only work if it’s being served by Adobe’s own Flash Media Server software. This is due to the files being streamed via Adobe’s own RTMP streaming protocol rather than the RTSP protocol supported by Apple’s Quicktime / Darwin Streaming Server or Real’s Helix servers.

This is a shame, but hopefully Adobe will see fit to change tack on this, perhaps it is just a technical issue in that they don’t yet have support for RTSP inside Flash player.

More information about H.264 and Flash Player 9

To get a great explanation about all the new changes then go and read Tinic Uro’s post "What just happened to video on the web?". Tinic Uro is one of the main Flash Player engineers at Adobe, in his post he introduces all the changes as simply as he possibly can. There’s also some information on Ryan Stewart’s blog – "The H.264 Announcement in Black and White".

~Rick

How to edit AVCHD footage on Mac OSX? Final Cut Pro 6.0.1 and Voltaic to the rescue!

I’ve written a few times recently about the difficulties people have had editing video footage in the AVCHD format that is used by the new generation of Disc-based HD Cameras such as Sony’s HDR-SR7 and HDR-SR8. The main issue when I first wrote about it was that there wasn’t really *any* software available to edit the footage regardless of whether you were using a Mac OSX or Windows based system. Although the cameras had been out since mid 2006 the first fully capable software for editing the footage only became available with the recent release of Sony’s Vegas 7 editing software for Windows.

Ok, so you can edit AVCHD on Windows, but how do you edit AVCHD on Mac OSX?

So things were looking up at least for the Windows using owners of AVCHD capable camcorders, things weren’t looking nearly so bright for those of us wanting to edit AVCHD footage on Apple Mac OSX. Fortunately there are at least a couple of options now for Mac OSX systems. The first option was a bit of a surprise, albeit a very pleasant one!

Final Cut Pro 6.0.1 update adds AVCHD transfer capabilities

Apple’s own Final Cut Studio 2 suite had a minor update for Final Cut Pro to version 6.0.1 which added the capability to transfer the AVCHD footage. The reason why this update was a little bit of a surprise is that Apple were not listed on the Official AVCHD Consortium website, at least not until recently. The transfer process converts the AVCHD footage into either Apple’s new ProRes 422 codec or the Apple Intermediate codec. One very important point to keep in mind here though is that the AVCHD transfer on Mac OSX only works on Intel processor based Macs!

Apple has posted a few technote articles regarding working with AVCHD in Final Cut Pro which are worth reading, here’s a few key points to keep in mind:

  • AVCHD support is available only on Intel-based Macintosh computers.
  • DVD-based AVCHD camcorders are not currently supported in Mac OS X.
  • Standard definition video recorded with AVCHD camcorders cannot be accessed in the Log and Transfer window.
  • AVCHD footage is transcoded to the Apple ProRes 422 codec or Apple Intermediate Codec.
  • When you choose to transfer AVCHD audio in the Logging area, audio is automatically mixed down to stereo.
  • AVCHD files are transfered as entire files from beginning to end.

You can find further information in the following Apple technote, Technote 305997: About transferring AVCHD footage.

VoltaicHD from Shedworx.com

Final Cut Studio is a great solution for editing AVCHD footage on Mac OSX, however, if you don’t have Final Cut Studio and can’t afford the £849 to buy it, or if you’ve got Final Cut Studio but you’re using a PowerPC based system (in case you missed the two references above, AVCHD support in FCP is only available on Intel processor based machines!) then there is an alternative – VoltaicHD.

VoltaicHD is a $30 utility that converts AVCHD footage into HDV 1080i Apple Intermediate Codec format Quicktime movies. The Voltaic website sums up it’s purpose clearly: "VoltaicHD converts your HD movie clips into a Mac-friendly format, ready for editing in iMovie HD and Final Cut Express HD". This shouldn’t be taken as a limitation, the converted footage can be used on any video editing application.

The purchase price of $34.99 is a lot less than the cost of Final Cut Pro and the advantage of working with both Intel and PowerPC based Macs is also pretty awesome. It’s a pretty new application but it is at least past the version 1.0 mark and is fairly stable, although the Voltaic FAQ page does list a few common technical issues that they are working on.

It’s worth reading through the VoltaicHD FAQ as they answer quite a lot of common questions about the issues encountered converting AVCHD footage using Voltaic. Some of the questions answered are:

  • How long does the conversion take?
  • How big are the output files?
  • What is the output format
  • Is there any quality loss in the conversion?

The VoltaicHD development blog is well worth reading as it gives the background to the past and future development of VoltaicHD. There are also some screencasts which are very useful, and finally there is a demo version of Voltaic available to download so you can try it out before paying any money for a licence. The only limitations in the demo are that it will only convert a single file less than 20mb and a limit of up to 10 conversions. However, for $35 buying a licence isn’t going to break the bank!

So which is best, Final Cut Pro or Voltaic?

Well, at the moment I can’t say, I haven’t tried either of these options at the time of writing. I have just purchased Final Cut Studio so I am now in a position to do a bit of a comparision between these two applications, I’ve had a fair bit of footage sitting waiting for the time that I would be able to edit it without having to resort to a Windows PC running Vegas 7! ;)

I’ll hopefully post a bit of a comparison once I get a chance to try both applications out.

But what about Adobe Premiere Pro CS3? Doesn’t it edit AVCHD?

Although Adobe Premiere Pro CS3 has now returned to the Mac platform neither the Mac or Windows versions supports the AVCHD format. There were quite a few rumours and unofficial statements by Adobe employees that indicated that it may have support for AVCHD but I have had it confirmed that there is definitely no support for it in Premiere Pro CS3, although it does look likely that it wil be in the next version. Perhaps there will be an incremental update to bring some kind of compatibility there in the way that Apple have added it to Final Cut Pro? Until that happens Voltaic is the best option for Premiere Pro CS3 Mac users.

Update #1 – Sony HDR-SR1 / SR7 Apple Tech Support Article

Someone posted a link in a comment below to an Apple tech Support article called “iMovie ?08 and Sony HDR-SR1 and HDR-SR7 compatibility” which is worth reading if you’re using one of those cameras, especially if you’re using a G5 processor based system rather than an Intel processor. It just goes to show that Voltaic is definitely a very useful application for those on non-intel, older machines who want to work with AVCHD footage.

Update #2 – VoltaicHD now on Windows! Convert AVCHD for use in Windows Movie Maker

You can now get VoltaicHD for Windows, so if you’re a PC user looking for an easy way to edit AVCHD footage and use it in Windows Movie Maker then go check out VoltaicHD for PC or read my more recent post Budget AVCHD editing in Windows: VoltaicHD for PC & Windows Movie Maker!

Update #3 – Burn Blu-ray compatible and AVCHD DVDs using RevolverHD for Mac

Once you’ve edited your HD footage then what do you do with it? Well, if you want to put it onto an blu-ray compatible DVD then now there’s an easy way! Find out more about RevolverHD.

Update #4 – VoltaicHD 2 released in October 2009

Shedworx have released version 2 of VoltaicHD adding new features such as preview of AVCHD / AVCHD Lite clips, native editing of AVCHD video and the ability to upload video to YouTube. I’ve written a post with an overview of VoltaicHD 2.

~Rick