An idea for improving iPhone App management in iTunes

The iPhone App Store is a huge success with thousands of applications available. However, it doesn’t take long after downloading a whole load of apps before you’ve got pages and pages of apps on your iPhone. With just two, three or maybe even four pages of apps it’s not too difficult to remember where specific applications are but beyond that it gets harder.

One solution to helping find the apps installed is to create pages with specific types of apps on each page, perhaps Social networking apps on one page, games on another and so on. However, you can soon end up with a lot of pages using this method. Currently on my iPhone I have about seven pages of apps and it’s getting increasingly difficult and time consuming to manage this as I add more applications.

Screenshot of my iPhone screen layouts
The current app screens on my iPhone

The problem is that you can only move applications around one at a time so trying to move apps from one page to another is a pretty slow and laborious process. It’s made worse because there is no way to adjust the order of the pages of apps or to insert a new page, so if you wanted to insert a whole new page in between your second and third pages the only way to do it is move all of the apps from the last page onto a new page. You can then move all the apps from the the third page etc one page forward, not a simple or quick process! Obviously this method of management is pretty useless with an increasing amount of apps.

Tuning up iTunes App management

So, what can be done to fix this? Well, I’m sure something could be done to make app management on the iPhone itself better but the solution I’ve got in mind is to improve the Applications management inside the desktop iTunes application.

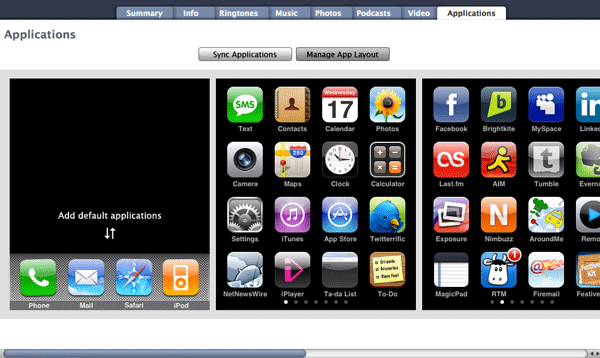
When your iPhone is mounted you can currently configure which Apps are synced across to your device, What’s needed is an additional panel within this section that shows the layout of all the pages of apps on the iPhone. This panel would allow you to easily drag and drop applications between pages using your mouse or trackpad, you would also be able to re-order the pages and insert new pages in between the existing pages. It would also allow you to delete pages including all of the apps on them, unless of course it contains any of the core apps that cannot be deleted. In that circumstance a warning message would appear indicating that fact but the page would be left alone.

Mockup of iTunes app management screen

It seems like a simple and user friendly way to manage all your apps. If you think of how you manage music in iTunes, you can create playlists and drag and drop files in and out of them. This method of management would give that same kind of control for applications.

So, how long until we see this method of app management in iTunes? ;)

Goodbye N95, Hello iPhone

It’s been 18 months since I got my Nokia N95 and I’ve enjoyed using it, the combination of a phone with a good quality still camera and also pretty good video camera along with wifi access has been great to use.

Since getting an iPod touch last christmas it was pretty much inevitable that once my phone contract was up that I would switch to an iPhone. Although the N95’s killer app is a great camera, the array of applications for the Nokia N95 pales in comparison to what is available for the iPhone and iPod touch.

In contrast to the N95 the iPhone’s biggest weakness is its camera, much lower resolution stills and no video support at all. However, overall the iPhone is a much better device so I will live with the camera as it is and will probably keep a pay as you go sim in my N95 and still make use of it for filming and photos. The iPhone’s killer app is the fact that there are many killer apps available for it due to the success of Apple’s App Store.

When I got the N95 back in June 2007 I called it my iPhone substitute, it’s served me well but I’m enjoying using my iPhone a lot. It’s sure to be the subject of a few blog posts in the months to come.

~Rick

iPod Touch 2.2 firmware update breaks BBC iPlayer (Fixed!)

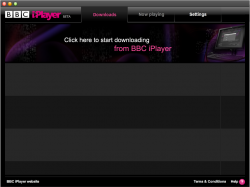
The recent 2.2 firmware update for iPhone and iPod Touch brought some great new features but also an annoying glitch, it breaks the ability to play content on the BBC’s iPod / iPhone version of the iPlayer site!!!

If you try to playback something on the iPlayer site you get a message saying "Sorry, programmes can only be accessed over a wifi connection". For some reason the BBC site thinks that I’m accessing it via a 3G connection, which isn’t allowed for the iPlayer site!

As it turns out this problem only affects iPod Touch users and not iPhone users, and the problem seems to be down to the detection script that the iPlayer site uses so it will require the BBC to make a fix to their code to resolve the issue, so hopefully it won’t take them long!

UPDATE
The problem has been fixed! Access to the iPlayer on the iPod Touch has been restored :)

New features in the iPod Touch / iPhone update

Update All in App Store iPhone firmware 2.2The update did bring some cool new features though, you can now download podcasts directly within the iTunes store application and there’s also an ‘Update All’ button in the App Store application, very useful when you’ve got a bunch of apps with updates. Safari has also had a revamp to its interface which makes better use of space by placing the search and address bars on the same line, each one expands to fill the whole line when you click into it. However, not all features are available on the iPod Touch.

No Street View in Maps for iPod Touch users

Typo in the iTunes Podcast section in iPhone Firmware 2.2One new feature that I was looking forward to checking out was Street View in the Google Maps application, but alas it turns out this is only available in the iPhone update and not the iPod Touch update. I’m not sure if this is intentional, perhaps due to the accounting differences between the iPod Touch and iPhone.

Usually when there are features added that require an additional fee for the upgrade it’s for completely new apps, not just for upgrades. Applying the same logic you’d expect to pay for the ability to download podcasts too. So I’m left wondering why Street View is missing in the iPod Touch update, maybe it’s just a mistake? There were a few other issues that got in there, such as a typo in the iTunes app Podcast section and a photo-resizing bug.

~Rick

Update:

Users with jailbroken iPod Touches have been able to turn on Street View on the iPod Touch, so I’m wondering more if this was an accidental omission in the 2.2 update.

Budget AVCHD editing in Windows: VoltaicHD for PC and Windows Movie Maker!

I’ve previously written about How to edit AVCHD footage on Mac OSX, at the time of writing that article there weren’t many options for editing AVCHD footage on either Mac OSX or Windows operating systems. VoltaicHD is a great application that helped Mac OSX users in particular because at that time there was no way of editing AVCHD on Mac at all.

Many Mac users had purchased AVCHD cameras and were frustrated by the complete lack of software available for editing AVCHD on Mac and even Windows users had to wait quite a few months before Sony released a version of their Vegas software that supported AVCHD.

Since then though, there are quite a few options for Mac users: Final Cut Studio and Final Cut Express offered mid to high end products for the Mac platform. Also Apple’s own iMovie software had a complete revamp and amongst many new features was direct support for AVCHD based cameras, a perfect budget solution as the software was included free with any new Mac or as part of Apple’s iLife suite for about £55 / $79.

However for Windows users, despite the availability of software like Sony Vegas, many people wanted a way to edit AVCHD without having to buy editing software that cost as much (or more!) than they spent on their cameras in the first place! There was no easy way to do this on a low budget, you could find articles on the web with instructions on how to use various applications or utilities to convert the AVCHD files into various formats, but nothing simple that would allow non-technical users to edit AVCHD footage. But now there is an easy solution.

VoltaicHD for PC & Windows Movie Maker: A low budget way to edit AVCHD!

The company that produced the VoltaicHD application for Mac OSX, Shedworx, has released a Windows version of VoltaicHD that is compatible with both Windows XP and Vista. You can convert your AVCHD footage into WMV or AVI format video which can then be used with Windows Movie Maker or other video editing application for Windows.

Windows Movie Maker is a video editing package that comes with both XP and Vista, and contrary to popular belief it is actually capable of working with HD video footage, but just not with native AVCHD footage. That’s where VoltaicHD fits in, by converting the footage to WMV format you can edit the footage from your HD video camera using just Windows Movie Maker!

Tips for converting / editing AVCHD with Voltaic and Windows Movie Maker

There are a few minimum system requirements to run VoltaicHD for PC but any reasonably modern PC should be capable of processing the AVCHD files. It’s worth noting of course that HD video is very intensive to work with and requires greater resources than editing conventional standard definition video footage. On a system with the minimum hardware requirements (as detailed below) it will take about 2 minutes to convert a 10 second AVCHD clip. It is obviously recommended to have as powerful a system as you can manage but even a slightly older machine should be capable of producing results – as long as you have a little patience and perspective! On the plus side the converted video files result in uncompressed HD video which can be played back more easily than the original AVCHD files on the minimum hardware spec machine.

Minimum Hardware requirements: At least 1GB of RAM, at least a 2Ghz P4 processor or equivalent processor and as much hard disk space as possible. AVCHD footage uses about 120Mb per minute of video footage, once this footage has been processed it uses about 500Mb per minute of video, so disk space is quickly used up.

Minimum Software requirements: Either Windows XP SP2+ or Vista, Microsoft Movie Maker 2.1+ and Windows Media Player v11+.

VoltaicHD can convert AVCHD footage to either WMV or AVI formats, however WMV is the preferred format as it keeps the aspect ratio correct no matter the resolution of your source AVCHD footage. There is no loss in picture quality when converting the AVCHD footage to either WMV or AVI. However, the audio track is affected during conversion, AVCHD can use Dolby 5.1 surround sound but only Sony cameras use this, Panasonic, Canon and JVC use stereo only. Any Dolby 5.1 sound is dropped back to stereo audio as this is all that Window Movie Maker supports.

Converting files using VoltaicHD for PC

You need set up the various preferences before using VoltaicHD for the first time, you can go back and change these preferences later by going to the Tools->Options menu option, or via the toolbar button.

  • Scratch file location: VoltaicHD creates temporary files during conversion, you can set where these should be created to a location of your choice. If you are converting large files from an external storage location, and want to preserve disk space on the machine running the conversions, you should set this location to be on the external storage device.
  • Output Directory: You can set where the final converted final files will be placed.
  • Extract 5.1ch Audio: The audio track from your movie can be extracted during the conversion process.
  • Output Format: WMV format is the recommended format for your converted clips.

Once you’ve got VoltaicHD installed on your system and Preferences all set up you are ready to go. Although it’s worth keeping in mind some suggestions for converting your AVCHD clips:

  • Make sure to copy all clips from your camera onto your hard drive before converting. It’s not worth risking trying to convert footage straight from your camera as it can be problematic.
  • Keep a VoltaicHD shortcut on your Desktop, this makes it easy to just drag AVCHD clips onto it ready for conversion, or just to open up the application ;)
  • Try closing down any unnecessary programs during the conversion process. Converting AVCHD footage is very processor / memory intensive so freeing up resources on your computer helps a lot.
  • Watch out when converting large AVCHD files if using a FAT32 formatted drive as the converted files may result in files larger than the 2Gb limitation of FAT32 will allow.

Next, add some AVCHD files to the file list and press Start. The converted files are created in the same directory as the source files by default, or to the location you set in your Preferences.

Setting up and editing in Windows Movie Maker

You need to set up Movie Maker to the correct video format for your region, either PAL or NTSC, and also to widescreen (16:9). Go to Tools->Options and click on the Advanced tab. You should then see a section called Video properties where you can set the correct format (NTSC or PAL) and also the Aspect ratio to 16:9. There’s no need to set the video format (NTSC or PAL) in VoltaicHD as this is auto-detected from the AVCHD clip.

You can now edit your HD footage just like you would with any other footage in Windows Movie Maker.

Exporting from Windows Movie Maker

VoltaicHD provides an export profile for Movie Maker 2.1 on Windows XP which ensures that the full HD resolution of your completed movie can be exported.

To Export from Movie Maker, select the File->Save Movie menu option. This starts the Save Movie Wizard. Use the following settings:

  • Movie Location: My Computer
  • Choose a name for your exported movie
  • Movie Setting: select Other, then VoltaicHD 1080 from the drop down.
  • Note: Select VoltaicHD 1080 PAL or NTSC, based on the format you are using.

If you are using Movie Maker in Windows Vista, then VoltaicHD provides an export profile to ensure that the full HD resolution of your completed movie can be exported. If your movies are in 1440×1080 resolution you will also need to manually apply an Effect to your clips to retain the full 16:9 aspect or Widescreen mode. Once your clips are in your storyboard or timeline, right click each of the clips and select “Effect”. On the next window under “Available Effects” scroll down and click on “VoltaicHD Widescreen” then select “Add >>". Then select OK. The preview window should now be showing your clip in widescreen mode.

To Export from Movie Maker, select the File->Publish Movie menu option. This starts the Save Movie Wizard. Use the following settings:

  • Movie Location: My Computer
  • Choose a name for your exported movie
  • Movie Setting: select Other, then VoltaicHD 1080 from the drop down.
  • Note: Select VoltaicHD 1080 PAL or NTSC, based on the format you are using.

Movie Maker will then create your HD movie! All thanks to VoltaicHD for PC!

Playing back your HD footage

If you want to watch your HD footage on something other than your PC then you can watch on XBox, PS3 or any Blu-ray player. You’ll need something like Nero to burn a blu-ray DVD (AVCREC format).

The makers of VoltaicHD for PC make some software called RevolverHD which can create blu-ray compatible DVDs. However, there’s currently only a Mac version available, so if you happen to have access to a Mac then you can use that. If you’d like a PC version of RevolverHD then get in touch with the guys at Shedworx and let them know.

Happy editing :)

Update – VoltaicHD 2 released in October 2009

Shedworx have released version 2 of VoltaicHD adding new features such as preview of AVCHD / AVCHD Lite clips, native editing of AVCHD video and the ability to upload video to YouTube. I’ve written a post with an overview of VoltaicHD 2.
Burn Blu-ray compatible and AVCHD DVDs using RevolverHD for Mac

You’ve got a spanky new HD TV, you’ve been editing your HD footage on your Mac. But how do you get your HD footage on it without buying a blu-ray burner and a blu-ray player?

The answer: Burn Blu-ray compatible DVDs using RevolverHD for Mac OSX and play your HD footage from a regular DVD disc.

RevolverHD for Mac – Make blu-ray DVDs

RevolverHD (another product from the makers of VoltaicHD) which helps you play your edited HD footage from iMovie08 / iMovieHD / Final Cut Express on the Playstation3. It can also create Blu-ray compatible AVCHD DVDs using the unedited AVCHD clips directly from your camera.

You can download the demo version which will give you 3 test exports or burns. There’s an easy to follow user guide which will take you step by step through the process for iMovie08, iMovieHD and Final Cut Express.

Make blue-ray DVDs, even on non-Intel Macs

Like it’s companion product VoltaicHD, RevolverHD will work on both Intel and PowerPC Macs on both OSX 10.4 and 10.5 which is good news if you’ve got an older Mac without an Intel processor. Don’t forget though that the conversion process used by RevolverHD is pretty intensive so using your old G3 iMac isn’t going to be very fast, although it should be possible!

It’s also worth noting that AVCHD DVDs may not work on some blu-ray players, check out the RevolverHD FAQ for more details.

I’ve done some test discs which have successfully played back on a friend’s Playstation 3 so it certainly seems to do the job!

Adobe Photoshop CS4 – Some of my favourite features

Adobe have now shipped their new CS4 suites, I installed my copy of Web Premium CS4 suite which includes Dreamweaver CS4, Flash CS4, Illustrator CS4, Photoshop CS4 and Fireworks CS4. There’s some excellent new features amongst all of these apps and I’m really enjoying using Photoshop, there are a lot of new features but there’s three in particular that I really like and will be useful in my every day use of Photoshop CS4:

Pixel Grid

Photoshop CS4’s pixel grid makes working at the pixel level of detail much easier by putting a white grid outline around each pixel once beyond a certain zoom level. It can be switched off if you don’t like it but it’s a handy feature when doing user interface work where you need to make pixel accurate selections.

Smooth panning

Photoshop CS4’s smooth panning makes moving around when zoomed in much simpler. If you’re used to using an iPhone or iPod Touch then this sort of flicking movement will be familiar.

Content Aware Scaling

Photoshop CS4’s Content Aware scaling is pretty impressive stuff! You can basically resize an image and it detects the areas in between main features such as face or figures and only scales the areas in between. Great for landscape shots or even resizing user interface elements like capsule buttons etc.

There are a lot more features to Photoshop CS4 that make it worthwhile, you can see a quick overview on the CS4 Top Features page.

There are also trial versions for a lot of the apps available on the Adobe downloads page.

Also, if you want to show some love for my blog you can also purchase the CS4 apps by clicking on the CS4 ads featured on this site or by clicking this link to the Adobe Store! ;)

~Rick

Dropbox drops out of private beta: Linux client, iPhone web interface, pricing plans

I wrote an overview of Dropbox back in April when I first managed to get an invite to the private beta. Ever since then it’s been a permanent install on my laptop and my desktop machines due to it’s simple yet powerful functionality.

Dropbox launches to the public!

The good news is that it’s finally out of private beta and anyone can sign up to try it out, you can download it and / or watch the demo video at www.getdropbox.com. It’s still in beta but at least now you can register to try it without needing to be invited first.

Linux geeks get some love

As promised Linux users now have a version of the dropbox client too. This makes Dropbox a truly cross-platform backup system, so regardless of whether you are Mac, PC or Linux then you can make use of Dropbox. As ever with Linux you’ll need to check out whether it will work with your preferred Linux distro but Ubuntu and Fedora 9 are supported with users of Gentoo, OpenSUSE and Debian managing to get it running. Full info is available from the Linux Dropbox download page.

iPhone optimised web interface

There’s also an iPhone optimised web interface available if you access it via your iPhone or iPod Touch. It’s a nice little addition that makes taking a look at your file storage whilst out and about even easier.

Dropbox pricing announced

The Dropbox blog gives some indication of how much they will charge once they finally go live with a paid-for service. As you’d expect from the people who’ve made backup via Amazon’s S3 storage infrastructure incredibly easy to use there’s going to be very simple but attractive pricing. A 50GB Dropbox will cost $9.99 per month or $99.99 per year. Sounds like a great deal to me!

Update:

Randsinrepose has a great post that sums up why Dropbox is awesome, "Dumbing down the cloud".

Show Suburbia some Dropbox love by following this link to sign up at www.getdropbox.com – I’ll get a bit of extra storage space and so will you!

Top ten useful Quick Look plugins for Mac OSX 10.5

One of the best new features that OSX 10.5 Leopard introduced was Quick Look. As the name suggests it lets you take a ‘quick look’ at the contents of a file without having to open up the actual software application.

Quick Look supports plugins so third-party developers can create Quick Look plugins of their own to give access to many other file formats. I’ve found Quick Look to be such an intuitive tool to use as well as incredibly time saving due to not having to wait for Microsoft Word open up just to check the contents of a Word document. A great boost for productivity!

Here, in no particular order, are 10 of the most useful Quick Look plugins that I’ve found. Please note, some of these require payment for full use:

BetterZip

Allows you to preview ZIP, TAR, GZip, BZip2, ARJ, LZH, ISO, CHM, CAB, CPIO, RAR, 7-Zip, DEB, RPM, StuffIt’s SIT, DiskDoubler, BinHex, and MacBinary files.

http://macitbetter.com/BetterZipQL-1.0

HD Quick Look

HD Quick Look lets you view the first frame of your AVCHD files. You can also view multiple files as a slide show, as an index sheet or full screen.

This is a really handy plugin for those working with AVCHD video and a perfect companion to Shedworx excellent VoltaicHD application for converting AVCHD footage!

http://www.shedworx.com/

Suspicious Package

It allows you to preview the contents of a standard Apple installer package without launching the Installer. Great for checking for any unwanted additional bits of software that sometimes companies like to add!

http://www.mothersruin.com/software/SuspiciousPackage/download.html

AppleScript

Gives a preview of AppleScript files.

http://www.kainjow.com/?p=77

FLV

Allows you to view Flash video files, please note that it requires installation of the Perian Quicktime plugin to make it work.

http://homepage.mac.com/xdd/software/flv/

EPS

Allows you to view EPS files.

http://www.eternalstorms.at/utilities/epsqlplg/index.html

Folder View

Allows you to see the contents of a folder.

http://homepage.mac.com/xdd/software/folder/

ColorXML

Enables display of XML files with indentation and XML syntax coloring.

http://www.macupdate.com/info.php/id/26194/colorxml-quicklook

SneakPeek Pro

Allows you to preview Illustrator, InDesign and EPS documents in the Finder, dialog boxes and other applications. SneakPeek Pro also allows you to see fonts, images and colors used in many CS3 documents.

It works with Illustrator files even if not saved with PDF compatibility. $19.95 but worth every cent if you’re a frequent Illustrator or InDesign user!

http://www.code-line.com/software/sneakpeekpro.html

GLColorCode

Adds enhanced source code colouring for various programming languages such as PHP, Actionscript, Objective-C etc.

http://code.google.com/p/qlcolorcode/

Adobe unveil Creative Suite 4 on 23/09, AIR for Linux, Flash Player 10 Release candidate

Adobe will be unveiling the next version of their Creative Suite software on the 23rd of September. This will be done via a special web broadcast, you can sign up for email notification via the following webpage – http://adobe.istreamplanet.com.

Details of any new features have not been revealed but Adobe did release public beta versions of Dreamweaver CS4, Fireworks CS4 and Soundbooth on the Adobe Labs website a few months ago.

Adobe AIR for Linux beta released on Adobe Labs

Support for the Linux operating system has been increasing from Adobe with continual improvements to the Linux version of the Flash Player plugin. Now Adobe have fulfilled their promise of full cross-platform support for their AIR runtime with the release of Adobe AIR for Linux beta.

Flash Player 10 release candidate on Adobe Labs

A new release candidate of Flash Player 10 was released on Adobe Labs. If you haven’t already checked it out then there’s quite a few new features such as 3D Effects, a new text engine, enhanced drawing API, GPU support and enhanced sound APIs to name a few.

Once you’ve downloaded it then go an check out the Feature demonstrations page to get a taste of these new features.

One thing to keep in mind though, if you a frequently upload images and video to sites such as Flickr, Vimeo and even Adobe’s own Photoshop Express web apps then you’ll want to avoid this version of the Flash Player just now as there’s still a ‘bug’ which affects the uploaders for these sites. It seems to be a hotly debated issue just now but it appears that Flash Player 10 stops these kinds of image uploaders from working due to a new security restriction. You can catch some of the discussion on this Flash Player thread.