![]() FlamingoHD is a new application by Shedworx (the guys that make VoltaicHD), with the purpose of helping you manage all of your AVCHD video footage. Although AVCHD has greater than ever support these days it still presents a challenge when it comes to managing all of the video that you’ve shot, especially as the convenience of shooting straight to disk or card kind of encourages you to record a lot more than you would when using tape!
FlamingoHD is a new application by Shedworx (the guys that make VoltaicHD), with the purpose of helping you manage all of your AVCHD video footage. Although AVCHD has greater than ever support these days it still presents a challenge when it comes to managing all of the video that you’ve shot, especially as the convenience of shooting straight to disk or card kind of encourages you to record a lot more than you would when using tape!
FlamingoHD provides a solution to this problem by enabling direct import from your AVCHD camera or alternatively importing AVCHD clips that are already on your hard disk. It does this by providing a preview thumbnail of the video footage before you import it, this saves a lot of time compared to iMovie or Final Cut Pro as you can choose only the clips you want without having to convert the footage first.
The user interface is easy to understand as it features a left hand menu very similar to iPhoto or iTunes which contains sections for Devices, Events and Projects, very similar to the iLife applications.
Importing AVCHD footage into FlamingoHD:
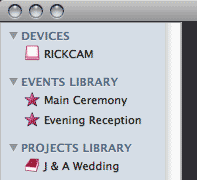 The basic process is to select the source of your video footage. You can either connect your camera to your computer which will automatically show up in FlamingoHD as a device, or you can select ‘Import Media’ from the File menu to select either a single clip or a folder containing clips from a location on your hard disk, once selected they will show as a device in the ‘Devices’ section in the left hand menu. It’s also worth clarifying that FlamingoHD will actually import video, audio and images from your source device or location and can manage all of these assets within Events and Projects.
Setting Preferences and Creating Events:
With a device selected ready for import you can then choose which clips you want to import into FlamingoHD, the imported files will automatically become an Event, or more than one Event if there are multiple clips shot on more than one day. This can be controlled by a preference which allows you to switch off this feature if you just want to import everything into one event.
The application preferences are worth checking out as there are a couple of other important preferences to consider. The first is ‘Hide media already imported’ which is enabled by default, this is useful when there are a lot of clips on a camera that you have already imported as it hides the ones you’ve already brought in.

The second important preference is ‘Copy imported media to Library area’, it’s important to set this appropriately because if it is ticked any clips imported from a folder on your computer will be copied to FlamingoHD’s Library which will take up more space and will result in duplicate files. Clips imported directly from a camera will be copied to the library regardless of this setting, the location of the Library for FlamingoHD can be set in the Base Location preference under the General tab.
Creating Projects:
 Once you’ve imported clips into FlamingoHD you can then group clips together into Projects, these projects can then be sent to exported in via several methods, either ready for editing or as final output.
Projects are created by selecting ‘New Project…’ from the File menu, this adds an entry under the Projects section of the left hand menu which you can name to suit. Once the Project has been created you can drag and drop clips from any of the events that you previously created.
Exporting / Converting Projects:
After creating a project you can then choose to export or convert your files. FlamingoHD has options to send files to VoltaicHD, RevolverHD, iMovie and also to the assets folder of other editing applications such as Final Cut Express or Final Cut Pro.
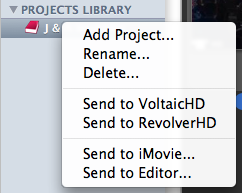 You can export by either right-clicking on the Project name or by selecting the Project and clicking on the ‘Media’ option from the main menu. The four options at the bottom of the menu allow you several choices for your project:
Send to VoltaicHD
This option will send your footage to VoltaicHD and it will be queued up and converted ready for use in whatever application you want.
Send to RevolverHD
Selecting this option will send your AVCHD files to RevolverHD where they can be burned as either AVCHD DVD or Blu-ray DVDs that can be played back on Blu-ray players such as the Playstation 3.
Send to iMovie…
This option is specifically for sending your project to iMovie, it creates a new project in iMovie and sends your clips to VoltaicHD for conversion, once converted you can open iMovie and all of the clips will be there in the new project.
Send to Editor…
Using this option will send files to a folder in the assets location of your preferred editing software, you can set this option in the Preferences of FlamingoHD. The AVCHD clips will be converted in VoltaicHD and copied to the folder. You can then open your editing software and bring in the files that are ready for editing.
In Beta and available now!
FlamingoHD has worked pretty well for me so far but it is worth pointing out that (at the time of writing) that it is a 0.1 version, as such it’s beta software and still being actively developed. However, the developers Shedworx have made it available to purchase now for the reduced price of $29.99 while it is in beta, the price will increase after the beta period.
FlamingoHD already provides a very useful application for managing all of your AVCHD media, but one aspect I haven’t mentioned is that it will also handle any video format that is supported by Quicktime so it can also be used for cameras that don’t use AVCHD as the video format. For me this is the key to the application’s potential, it fulfils a function that Apple’s own iLife suite doesn’t provide, that of being a specific video asset management tool.
The only criticism I can see is that it currently doesn’t provide direct playback of the video clips that are imported into it, instead the files are opened into Quicktime player. The biggest drawback of this being that Quicktime player doesn’t currently support AVCHD clips. However, Apple’s next release of Mac OS X, 10.6 ‘Snow Leopard’, is supposed to support AVCHD so that will be one solution, but in the meantime perhaps enabling AVCHD clips to open in the open source VLC player could be integrated as this already provides playback of AVCHD footage. The next release version 0.2 will provide a film-strip view of clips which will at least make it easier to examine the clips in more detail without needing to open them.
Give it a try for yourself, there’s a demo version that is limited to a maximum of 2 events, 2 projects and 50 clips, this gives you enough to try it out and kick the tyres. There are also demo versions of VoltaicHD and RevolverHD so you can test out the whole workflow. Finally, don’t forget to give feedback to the developers via the FlamingoHD contact form, they’re keen to consider people’s ideas and to hear about any issues people encounter with the software.
 Ok, slightly odd to call this a review when I haven’t even read the book yet! However, eduStyle have published a book titled “The eduStyle Guide to Usable Higher-Ed Homepage Design”, given that the website is such a good resource then it’s certain that the book will be very useful too. It’s been released as a PDF version initially and will be published in print in due course for those, like myself, that like the feel of real paper! The book has some interesting goals:
 So, Macworld SF 2009 Keynote, where was the


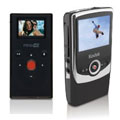
 Anyone who is into skateboarding and owns a games console has no doubt played at least one of the many games in the Tony Hawk Pro Skater series. This game defined the genre for several years and had no equal. In recent years EA’s Skate presented the first game to seriously challenge its place at the top. One of the things that set Skate apart from the Tony Hawk games was that there was a learning curve more closely resembling the real skate experience. Skate was also helped by the capabilities of next generation consoles like the Playstation 3 and the XBox 360 which offered amazing graphics.
 Nintendo’s DS and Wii consoles represented a new approach to gaming. Instead of focusing on photo-realistic graphics like the PS3 and XBox 360 these consoles used a combination of unusual interfaces and input devices to create a unique and new gaming experience. The release of these consoles brought a slew of games making use of the DS’s two screen / stylus input and the Wii’s highly-physical Wiimote / accelerometer based controls. A follow-up title
 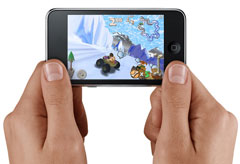 As I said before Apple really seemed to kind of just sneak in with the iPhone as a gaming platform, although many saw the potential of the iPhone as a platform for mobile applications I don’t think many realised just how capable the platform was especially in the area of graphics performance on such a small device.
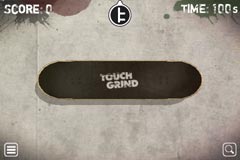 Touchgrind (
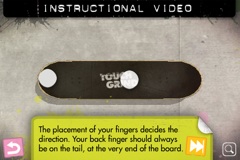
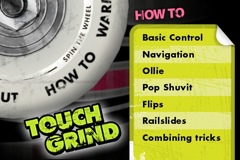 The interface for Touchgrind is nice, you spin a skateboard wheel and choose from one of six sections on the wheel: Options, About, How To, Warm Up, Jam Session and Competition. Options lets you switch off sound effects and About gives you a link to the developer’s website. The next option gets you into the nitty gritty, How To is the first thing you need to check out when you first try out Touchgrind as it explains the concepts of how to maneuver the board and do tricks.
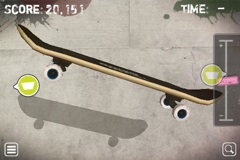
 After working your way through the How To section and you’ve managed to get to grips with the basic controls then the next section to check out is the Warm Up. This section lets you just go and cruise around, there’s a few ramps and a rail that you can try and grind. There’s not that much to skate but the point is just to get familiar with skating around, trying out the various tricks on some real obstacles as well as in the large amount of empty space around the obstacles.
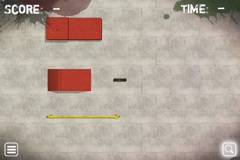 To help you know how near you are to obstacles there is also the ability to zoom out by clicking on the magnifying glass in the lower-right hand corner. The view then zooms out and you can see a larger area of the park, not the entire park but a larger section so you can get a better idea of what you’re trying to skate towards.
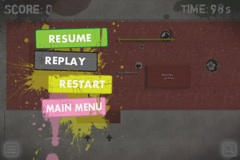
 Competition is the final section and this gives you a 100 second time limit in which to skate around and build up as many points as possible. As you get higher scores new boards are unlocked which can be selected when starting the Competition or Warm Up sections. I’ve managed to get to over 400,000 points so far but still have a way to go to get over 1,500,000 points to get the highest board! I’ll need to practice a bit more :)