The V and A at Dundee Exhibition

Abertay University library are hosting an exhibition of the shortlisted finalists for the Architectural designs for the planned V&A Dundee building.

It’s really useful seeing some actual models of the buildings rather than just the rendered images and video that you can see on the website so it’s worth getting along there if you can.

I thought I’d post how I rank the six finalists, it’s quite a tricky decision really as there are interesting aspects to all of the designs:
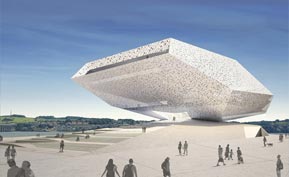
1. REX

Basically I like this one best because of the visual impact it has, it looks impressive from the outside but also exposed those inside to the impressive views over the Tay. I think it would make a great feature at the waterfront and is obviously very different than any other planned buildings for the location.

The glass face and angles remind me of ice or icebergs which perhaps hints at Dundee’s history with south atlantic exploration, whaling etc.

The only unknown aspect of this design for me is how the glass panels will be connected, it’s not that apparent from the visuals or the model as they just appear to be huge panels of glass.
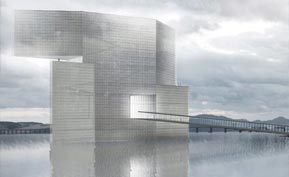
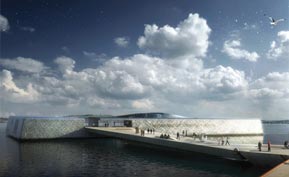
2. Snøhetta

This building is very different than the Kuma, completely understated in comparison to the Kuma and most of the other finalists. However, the Snøhetta design reveals itself more when you look into it, it is actually intended to rise and fall with the tide and will actually generate energy for use in the building.

I think it’s really important that whichever design is chosen it should really make the best use possible of renewable, sustainable energy sources such as solar, wind and tidal power. All three of which are available at the site of the building. Although this design has much less visual impact from the shoreline it actually looks great from the river itself.
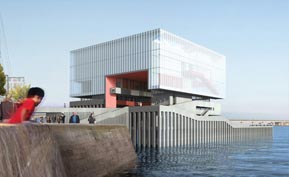
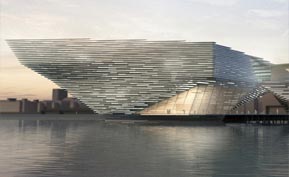
3. Kengo Kuma

This was originally my favourite design, it has a big impressive aspect which is reminiscent of a ships bow and stern from certain angles, presumable this isn’t just me making it up and it is intentional! The light appearing through the horizontal strips of the buildings exterior is subtle and would look amazing at night time.

The biggest problem I see with this design is how it will look as time goes on, it looks to be the perfect seagull magnet with all of the horizontal beams of the structure presenting perfecting roosting locations for seabirds. An unfortunate clash with reality there for this design, I can’t see how they could prevent this from happening without resorting to prevention methods which would be both costly and unsightly.

Perhaps another issue is cost, I’ve read some comments that suggest it would be overly ambitious to achieve for the overall budget, we don’t want to see another Scottish Parliament style overspend.

4. Delugan Meissl

My initial reaction to this design was that it looked pretty crazy, like a spaceship had just touched down in the middle of a plaza. However, having looked at the model closeup I actually quite like the interior space.

It’s quite an unusual, imposing design (to say the least!) which definitely makes a statement. However, it’s perhaps a bit too off the wall. It’s also not very clear how the exterior finish will be done, it looks to have some form of translucency to it, almost like a see-through space shuttle with the black and white colour. I’m not sure if it’s a little bit too retro-futuristic.

One other concern with this design is how it will work with the forces of the wind, it can get a bit windy down on the river sometimes – will there be some unexpected wing effect? It’s an interesting concept and the interior offers space which would definitely be very functional and would work well for gallery space etc, perhaps better than some of the other designs. Overall, perhaps it’s a bit too "Take me to your Leader" to be in the running.

5. Steven Holl

I’m now getting to my least favourite of the designs. I’m pretty unimpressed by this design overall, partly due to the renderings of it just being quite vague. It looks quite indistinct and hazey, like the Meissl design I can quite see how the surface of the building will look or function – is it glass or a cloth-like material?

The renderings showing this design against the backdrop of Dundee really didn’t work for me either, it just didn’t look good. Overall the renderings make it look like a building that’s only half there – like a building that is trying to appear from another dimension but can’t quite make it all the way.

It really just looks quite non-distinct, you can see from the rendering to the right that it just merges in with the grey-ish clouds they’ve depicted in it, all of the other renderings are the same. Perhaps if they’d presented it in nice bright sun light it would have a better impression upon me. Dundee is considered to be the sunniest city in Scotland so at least presenting it in that light would help.

6. Sutherland Hussey

Last in my ranking is unfortunately the design by the only Scottish architect practice. My initial impression is that it is just too boxey, especially in comparison to the other finalists.

It just doesn’t seem organic in anyway, I don’t mind the main aspect of the building to some extent but it’s the surrounding vertical columns of the pier it’s set on that further add to the rigid box-like appearance. Perhaps if it was on a softer, smooth landscaped environment then the simple box shape of the building would make an interesting juxtaposition?

So unfortunately it’s last in my ranking, although I’d say it’s probably tied with number 5 though, the more I look at number 5 I would perhaps be tempted to swap them over, but I’ll leave it as they are for now.

~ ~ ~ ~

What I’m really interested to hear about for all the designs is the type of materials, the use of renewables etc. The location provides great opportunity to make use of things like vertical axis wind turbines and tidal power generation, Dundee hopes to be at the forefront of renewable energy technology so these buildings should walk the talk too.

You can view more about all 6 finalists over at http://vandaatdundee.com/your-future/shortlist/.
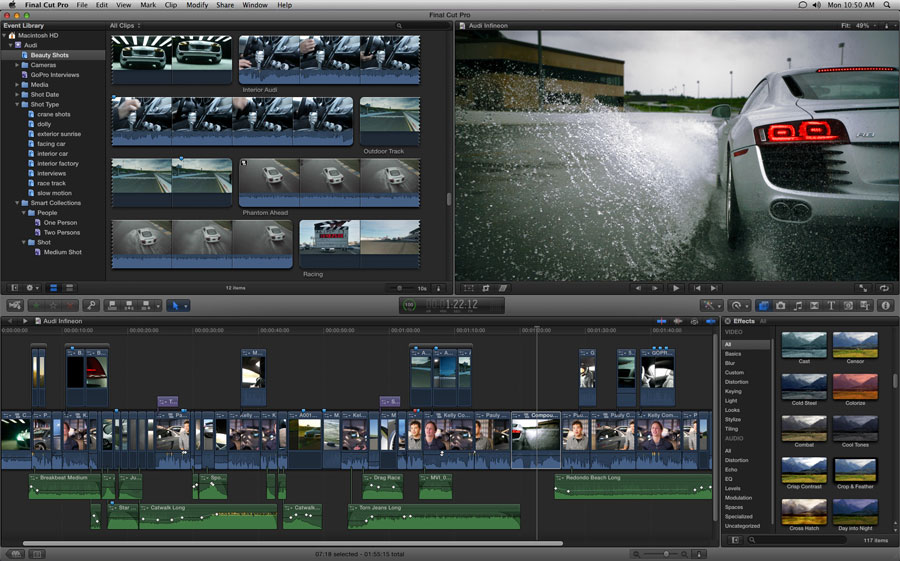
Review: Amazon Kindle

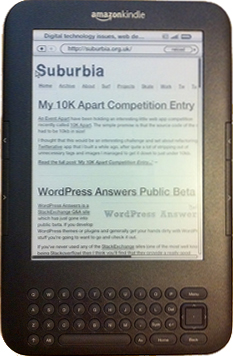
I got a chance to play around with a Kindle e-Reader device yesterday (my Mum bought one!). It’s quite a neat little device that works brilliantly for it’s main purpose: reading things.

The screen seems almost fake when you first see it as it doesn’t look like a normal screen, it almost looks as if it was printed on. It’s actually really great for reading though.

The weirdest thing for me is that I just want to tap on the screen to interact with it after being so used to that with my iPhone.

There’s an experimental web browser on it which is usable albeit a bit clunky due to the lack of touch screen, it’s great for reading text-based content though so it’s handy if you just want to read some stuff online.

Although people have tried to compare the Kindle to Apple’s iPad, I wouldn’t say that it is a competitor at all, I think it’s more like the original iPod which was created with one function: ‘listening to stuff’, but the Kindle’s one function is: ‘reading stuff’!

Overall I’m pretty impressed with it as a reading gadget, I could probably see myself getting one for at home. It just remains to be seen whether the rumours of a 7" variation of the iPad have any truth behind them, the touch screen benefits of a device like that could win out if it can be close to the light weight of the Kindle too!

My 10K Apart Competition Entry

An Event Apart have been holding an interesting little web app competition recently called 10K Apart. The simple premise is that the source code of the site had to be 10kb in size!

I thought that this would be an interesting challenge and set about refactoring my Twitterative app that I built a while ago, after quite a lot of stripping out of unnecessary tags and images I managed to get it down to just under 10kb.

I submitted my app just before the competition closed so I don’t know if it will get many votes from people but it was still fun to really dig in and make something as small as it can possibly be.

My entry can be viewed over on the 10K Apart site via this url:

http://10k.aneventapart.com/entry/details/339

Screenshot of Twitterative app

WordPress Answers Public Beta

WordPress Answers BetaWordPress Answers is a StackExchange Q&A site which has just gone into public beta. If you develop WordPress themes or plugins and generally get your hands dirty with WordPress stuff you’re going to want to go and check it out.

If you’ve never used any of the StackExchange sites (one of the most well known being Stackoverflow) then I think you’ll find that they provide a really good environment for asking questions if you’re in need of help. I’d encourage you to get involved and try and help answer other people’s questions, there’s more and more being asked and you just might be the person who’s written a piece of code or tried out a plugin that will help somebody solve their problem!

Review: ‘You Gotta See This!’

"You Gotta See This!" is a photography app by Boinx software for the new iPhone 4 which makes use of the gyroscope feature to quickly capture panographic images.

It’s a pretty fun app to use to capture some unusual images. You just press the button and it starts to record images as you move around the scene you’re trying to take photos of and then it overlays all the captured images rendered as one big image which can rendered using several themes.

You can then post these themes to Facebook, Twitter etc and save them to the camera roll on the iPhone.

if you’ve got an iPhone 4 it’s a cheap (£1.19) little app that makes use of the new hardware features offered by the iPhone 4. Here’s a few more sample images made using it:

Photoshop CS5 Content Aware Fill experiments

I posted these examples of Photoshop CS5’s new Content Aware Fill function to my Flickr account a few weeks ago but I thought I’d post them here too.

I’ve just started exploring all of the apps in the CS5 Master Collection so I might post a few other experiments from Photoshop and other apps as well. Click on the images to view a larger version.

Child / No Child

Cows / No Cows

Skater / No Skater

Review: Adobe Dreamweaver CS5

Dreamweaver CS5 iconAdobe have just announced the new version of their Creative Suite software, CS5 adds a whole range of new features across the whole range of their applications.

As a web designer / developer it’s the updates to Dreamweaver CS5 that I’m most interested in. I’ve used Dreamweaver as my main development environment for years even though I’ve used it in a very code oriented way and haven’t relied much on the Design view mode in the application.;

Part of the reason I haven’t relied on the Design view aspect is that historically it was pretty poor at rendering more up to date HTML / CSS techniques. It was also unable to render the custom PHP code used in my own PHP applications or in any other PHP based CMS apps like WordPress, Drupal etc.;

Dreamweaver CS4 did bring some improvements with the addition of the WebKit framework as the rendering engine for Design view and Live view which solved a lot of the HTML / CSS rendering issues and added support for many of the CSS features that WebKit supports.

Improved PHP Code Hinting and Introspection, Live View

Dreamweaver CS5 takes those steps a good deal further and now adds greatly improved PHP Code Hinting which can discover your own PHP functions and classes as well as those in CMS frameworks WordPress, Drupal and Joomla. The major benefit of this for the Design view and Live view is that instead of a jumbled mess of un-renderable PHP and HTML code you get the actual site running right inside Dreamweaver.

Dreamweaver CS5 custom code introspection

When you combine this with the new Inspect mode you get the ability to inspect elements on your page and see the CSS properties used, it’s very similar to some of the features offered by the Firebug add-on for Firefox or Web Inspector inside Safari.

The combination of these features together make it a huge leap forward for code-based designer / developers like myself. If you’ve previously been put off by the rendering aspect of Dreamweaver before then it’s definitely worth checking out again.

What about HTML5, CSS3, Web font support?

There’s been a lot of noise about HTML5, CSS3 and Web Fonts (@font-face) in recent months, not least because of the prominent debate over Flash support on iPhone OS devices. A lot of people might expect Dreamweaver to add support for HTML5 and CSS3, however, at first glance you might be a bit disappointed.

David Powers over on the FoundationPHP blog wrote a great writeup of Dreamweaver CS5 in which he makes a valid point about the lack of prominent support for HTML5 and CSS3. The HTML5 and CSS3 standards are still evolving so it’s difficult for any IDE to add support for them without the risk of something changing or breaking, especially with the HTML5 standard.

Dreamweaver CS5 does however offer support for using the HTML5 doctype for your documents, also the WebKit framework used in Design view and Live view will also render many of the CSS3 features that the WebKit framework supports, so if you’re writing code by hand then you can still use and preview many of these CSS properties.

Dreamweaver's Live View rendering of Suburbia.org.uk

(The screenshot above shows https://qreate.co.uk viewed right inside Dreamweaver’s Live View, note the TypeKit fonts rendering happily inside Dreamweaver’s WebKit based Live view).

Web Fonts are still a hot potato in many ways so as yet there is no direct support for adding those within Dreamweaver, but again WebKit will render them so adding the @font-face code by hand will get you there.

CSS3 Code hintsThe good news for CSS3 and Font-face etc is that Dreamweaver can be extended very easily to add support for, even better news is that I have already written a couple of Extensions for Dreamweaver which can be downloaded for free from the Dreamweaver Exchange, you can also read a bit more about them on the Projects page of this site.

I’m hoping to write on to add support for HTML5 tags too, with these extensions you’ll get code hinting support for adding these into your code. Please try them out and give me feedback as to how they can be improved and I’ll see what I can do to make them better. David Powers has also written an extension for adding / converting RGBa colour values too which is another handy tool, you can download it and other useful DW extensions from his Extensions and Tools page.

Improved Subversion support

Subversion version control support was added with Dreamweaver CS4, however I wasn’t very keen on how it was implemented and it lacked many features so I’ve continued to use alternative standalone apps for managing version control on OSX. Subversion support has been improved in CS5 though so it looks to be a more viable option now, I will try and give it a fresh comparison to see how it compares to the standalone alternatives now. One major difference in CS5’s support I believe is that Subversion can be upgraded without Dreamweaver itself having to be updated so this will help keep it more up to date.

BrowserLab integration

Adobe BrowserLab logoI’ve written about BrowserLab before, BrowserLab is a great way to test web pages in different browsers and Adobe has continued to improve it by adding more target browsers to the list as well as the ability to save local copies of the rendered previews as jpeg images.

The integration of BrowserLab in CS5 along with all of the improved Live view rendering improvements makes for a great development environment. BrowserLab has been a free service so far as part of Adobe’s Labs beta program, it will however ultimately be a paid service but purchasers of CS5 software will get included access for a year. Standalone pricing has yet to be announced.

Recommended upgrade

All in all Dreamweaver CS5 is a great step forward, it’s definitely got some genuinely useful improvements to offer my own code-centric workflow especially that I’m now using WordPress for many projects. I’d definitely recommend giving it another look if you haven’t been using Dreamweaver for any of the reasons I’d previously mentioned.

Shedworx’ State of the Union 2010

I’ve written a few times about the various apps that the guys over at Shedworx make and I’m always keen to see how their product range is developing and improving.

They published a blog post recently outlining their development plans for 2010 and their main focus for 2010 is on two areas: AVCHD workflow and Digital Asset Management. As such there’s some great improvements in store for their VoltaicHD and FlamingoHD applications.

VoltaicHD: End-to-end native AVCHD workflow

In their post they talk about how they’ve always been working towards having a completely native AVHCD workflow for VoltaicHD which started with the basic AVCHD editor that was added to VoltaichHD 2.

The next step in the process is adding native AVCHD output from Voltaic including trimming / joining files. So you’ll be able to import AVCHD footage from your camera, do some simple editing and then output an AVCHD format file without having to do any format conversion. The end result should fast output of great quality files.

One cool aspect of this for me is that I’ll be able to edit some AVCHD footage and then burn it as an AVCHD disk that can play on my PS3 using Shedworx’ other app RevolverHD.

VoltaicHD is available as both Mac and Windows apps.

FlamingoHD: Improved Asset Management

FlamingoHD is Shedworx’ youngest product but one that has proven to be very useful for managing media imported from AVCHD cameras.

The areas to be improved in 2010 include re-working the media views to provide a faster, easier way to navigate your library.

Improvements in managing your library and metadata. Support for simple editing of all supported media types is also a planned feature.

FlamingoHD is available as as Mac app.

Shedworx Forums

So, I’m looking forward to seeing the improved apps as they’re released. Don’t forget too that Shedworx have support Forums on their website so if you’re looking for help and support with their products then it should be first on your list of places to go:

http://shedworx.com/forum

More random thoughts on the iPad

I’ve already written my thoughts on the iPad, but here’s a few more thoughts about the iPad that have either been going through my mind or I’ve read about elsewhere and that I think are worth drawing attention to.

Another reason why Flash won’t be on the iPhone: Flash isn’t the only web plugin

If Apple allows Flash on the iPad (or iPhone / iPod touch) then the floodgates will be opened for other plugin such as Microsoft’s Silverlight and Java to be allowed onto the device. Possibly even opening Apple up to anti-competitive scrutiny for only allowing Flash. If Flash isn’t on the iPhone then no other plugin / runtime has any more of a right to be there either.

Mac OSX Snow Leopard an indication of OSX on iPad-like devices?

Reading this TechCrunch article about rumours of a possible larger iPad running something more like the full Mac OSX made me wonder whether the slimming down process involved in the development of Snow Leopard is a clue as to whether we’ll see OSX running on lower-powered, lower-energy processors. Perhaps we’ll even see Mac OSX running on the ARM processor architecture itself? Even if not on a different processor architecture then at least on some other efficient low-powered chip.

The controlled nature of the iPad’s OS has gotten some people worried that future versions of Mac OSX will end up being the same with no ability to install apps of your own choosing etc. It would be interesting to pose this question directly to Steve Jobs – just what is the future of Mac OSX? I guess we’ll find out at the next WWDC!

Many Flash games websites wouldn’t be playable on the iPad

Louie Mantia makes some really good points in his article “Flash Isn’t The Problem, Flash Design Is The Problem”. Many Flash based websites rely on you hovering over menus to navigate through them, and the majority of Flash games use the keyboard as the means of controlling them. Both of these methods of interaction are not applicable to the iPhone or iPad’s interface paradigms, as such even if Flash was on the iPhone or iPad you wouldn’t be able to use many of these sites or play many of the games!

~

If I think of anything else or find other interesting post I’ll add them here :)

Tip: Setting up a Minolta PagePro 9100 printer under Snow Leopard

Mac OSX 10.6 brought quite a few new but subtle features and changes, one of those subtle changes was the dropping of support for the AppleTalk protocol. Many people who upgraded to Snow Leopard (or newer versions of OSX) got caught out and suddenly found themselves with a non-functioning printer.

I was aware of this change but even so I found myself in the same position, and despite all the various articles and posts I read I couldn’t get my Konica Minolta PagePro 9100 printer working. I resorted to sharing my printer via an old iMac that was running OSX 10.4 and printing that way, it worked but would take a long time to print a single page and frequently had to be rebooted to keep it working.

After running like that for a few months I decided to try and figure out how to get the PagePro 9100 working directly again as I couldn’t handle using the same slow process any more. Amazingly I managed to find a Konica Minolta setup guide and it actually worked! So here’s the process:

Configuring a PagePro 9100 printer under Snow Leopard

I followed instructions in an old Konica Minolta support PDF document that you can download from the Konica Minolta site, unfortunately their site is rubbish and doesn’t let you link to files easily so here’s a link to download it:

http://dl.dropbox.com/u/18567/Crown-MacOS10_3-installation.pdf

Note: Before you start you’ll need to know your printers IP address, the PagePro 9100 can be set to have a fixed IP address but this wasn’t needed when printing using AppleTalk so yours may not be set up with one. You’ll need to get that changed using the printer’s controls on the top. You really need to get this sorted out before you can proceed any further. Update: See end of article for help with IP address settings on your printer !

Ok, here’s the simple setup process:

  • You need to set the printer up using the IP printing method, you’ll see a blue circular globe icon in the Add Printer dialog so click that option.
  • Use the Line Printer Daemon option under the ‘Protocol’ drop down.
  • Enter the fixed IP address of your printer into the ‘Address’ field.
  • Enter a queue name in the ‘Queue’ field (I used PagePro 9100).
  • The ‘Name’ field will probably have taken the IP address automatically but this can be changed to PagePro 9100 too.
  • Select the ‘Select Printer Software’ in the ‘Print Using’ dropdown at the bottom. You should be able to find the Konica Minolta PagePro 9100 PPD file in the list. Choose that from the list.

Set the appropriate trays / bins etc for your printer etc and then that should be you set up hopefully!

Addendum: Configuring the IP address settings on the PagePro 9100

In response to a request for help in the comments below I’ve added some instructions on how to configure the IP address settings on the PagePro 9100. Configuring the settings is a bit of a pain due to the tiny little single-line display on the printer, but hopefully these instructions will help!

You need to make sure the printer is not getting a dynamic IP address via DHCP, so you need to disable DHCP on the printer. Once that is switched off you can then set the fixed IP Address that is required in order to set it as per the instruction in this article.

To get to the settings to do this press the green ‘Online’ button on the printer controls to put the printer into Offline mode, then use the ‘Select’ / ‘Next’ / ‘Previous’ buttons to move through and select options.

You need to drill down to the following settings:

Menu -> Administration -> Communications -> Optional NIC -> Crownnet -> TCP/IP

Now that you are in the TCP/IP options you need to disable DHCP, select ‘DHCP’ from the available options (there are quite a few to choose from, just keep clicking through using the Next/Previous buttons), set this to ‘#disabled’ and then click the ‘Menu’ button once to move back up one level.

You now need to set the fixed IP address, you should be back up one level with ‘DHCP’ showing in the screen. Click next a few times and select ‘Internet Address’, you should now be able to enter all the digits of your IP address. Please note that you need to include 3 digits for all four parts of the address, so rather than just ‘192.168.0.4’ you need to enter ‘192.168.000.004’.

Make sure to use whatever IP address range your network runs on, routers use various different ranges so you need to set an IP address that is appropriate for your network’s range.

Addendum #2: Get default page size on PagePro 9100 to be A4 instead of ‘Other’

If you’re using the PagePro in the UK or at least with UK region settings in order to print to A4 paper then you may find that whenever you print that the printer always uses a default page size of ‘Other’ instead of A4. Although this actually prints to A4 correctly it always bothered me that it showed this way, so I decided to figure out what the problem was.

After a bit of looking around in the PagePro 9100 OSX EN.PPD file I found all the entries relating to A4, in PPD files the dimensions of paper sizes are configured using a dimension called points, basically there are 72 points to an inch. In the case of A4 in this PPD the dimensions used are 596 by 842, however, A4 is a metric-based page size of 297mm by 210mm so I checked out what these convert to in points.

It turns out that the PPD rounds all of the page dimensions to the nearest point, so I then edited the PagePro’s PPD file to use the accurate point dimensions for A4 which are 595.28 by 841.89 (you need to replace it in a few locations in the file). I then re-setup the printer with the updated PPD and it now uses A4 as the default page size once more! It seems that OSX 10.6 is fussier about the specific page dimensions than OSX 10.5 was, but this tweak sorts it out. I’m sure you could modify the PPD for any other paper format that you wanted to use, just google the correct point dimensions for your page size and the update it in the file.

Here’s a link to an already modified PagePro 9100 PPD file with updated A4 dimensions to save you having to tweak it yourself.

Addendum #3: OSX 10.7, 10.8, 10.9, 10.10, 10.11, 10.12

These instructions will basically work for all version of OSX since Snow Leopard, so 10.7 Lion, 10.8 Mountain Lion, 10.9 Mavericks, 10.10 Yosemite, 10.11 El Capitan definitely all work and 10.12 Sierra should be fine too as the protocols used are the same.