Dookie Demastered

I’m not particularly into Green Day but this is pretty great, “Dookie Demastered” is their response to the usual “remastering” and re-release of albums when they reach certain age milestones, in this case it’s 30 years since their album “Dookie” was released:

https://www.dookiedemastered.com

Basically the album was “re-exploded onto 15 obscure, obsolete, and otherwise inconvenient formats“, from a wax cylinder to game boy cartridge, floppy disk and an electric toothbrush.

I love the Handheld heroes-esque nature of this, including the great line drawing near the bottom of the site which shows all of the formats.

A Spacious place

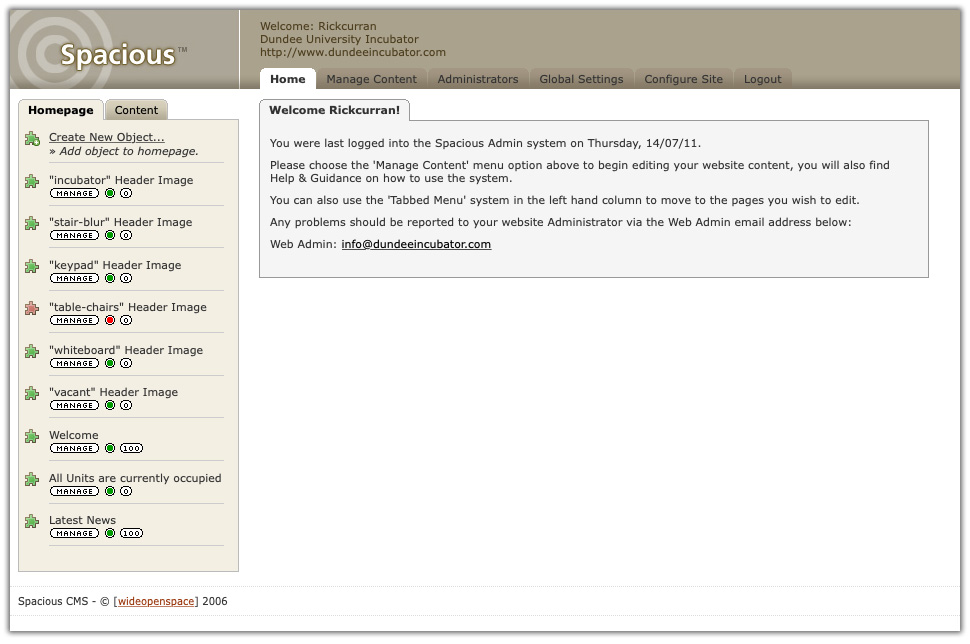
I had a request the other day to find login details for the administrator of an old client website that we built for Dundee University in the earlier years of wideopenspace, the web design company I used to run. I hadn’t realised that the old client site was still up and running all this time after having been launched in 2006!

It was an amazing nostalgic blast-from-the-past to log in to the site’s control panel and see our custom-built content management system again! I’d kind of forgotten about the 100’s (actually, more like 1000’s!) of hours worth of time and effort that my business partner Andy and I put in to developing it and implementing it on client projects.

The CMS was called ‘Spacious’* and actually came in two versions, the full version with a multi-level navigation system and various custom modules and a ‘Spacious Lite’ version which was made for really small sites with single level navigation and also had access to certain modules.

Last logged in on 14/07/11, it had definitely been a while!

When we started development of our CMS around 2004 we hadn’t really used any third-party CMS platforms (WordPress V1 actually came out in 2004 but it wasn’t really on our radar). Instead we wanted to make something that suited our own specific purposes and client needs. So we didn’t really look at how any other CMS’s were doing things but in a kind of intentionally-naive way built it to work how we wanted it to work for the sites we were building for clients.

We used Spacious for a quite a lot of sites and we actually tried to secure funding to enable us to develop it into a fully fledged CMS product to sell to other companies, but sadly we never succeeded in getting funded. Eventually we stopped developing Spacious and as a company we increasingly moved our focus to WordPress as a platform around about 2009 (probably WordPress 2.7 I think?).

Client budgets were getting tighter and awareness of open source systems like WordPress was increasing. As such it was getting harder to sell clients a licence for a commercial CMS so financially the time spent building and maintaining our own one made less and less sense.

From a development perspective I found that WordPress had a lot of technical similarities to how we’d chosen to structure our CMS. Spacious had similar concepts of posts and pages, a plugin system offering various functions like Events, Email contact forms, Staff directories (‘modules’ in Spacious’ terminology), comments and even a form of multisite that could run more than one site from a single installation. (Spacious had some really cool features built into it that I’m pretty proud of in retrospect!)

From a client-facing perspective I liked the simplicity of WordPress, it was cognitively easy to use – especially compared to the complexities of something like Joomla at the time (I remember seeing all the steps that an incoming new client had to go through to edit their existing site in Joomla and it was extremely complex and confusing!).

As WordPress became our main focus the list of live client sites running Spacious grew shorter. So it’s very cool to see not just one but actually two sites that are still live and running on Spacious after all this time!


* Originally we wanted to call it ‘Fabric’ and trademark it but we weren’t successful – that’s a whole other story!

A work-around for aspect-ratio percentage padding issues on flex items in older versions of Firefox and Edge

Whilst working on a recent project I needed to enforce a fixed ratio on some elements in the layout. In this case I used the ‘Aspect Ratio’ method which uses a ‘0’ height element with a percentage-based ‘padding-top’ value (More info about that in this CSS Tricks article).

The problem I ran into was that I was also using Flexbox for layout so each element was a Flex item, all of this was fine in Chrome and Safari and also in recent versions of Firefox and Microsoft Edge 17, 18 and in the upcoming 19.

But when testing in Edge 15 and 16 I found that the elements with the aspect ratio method applied to them were just completely invisible. Looking into it further I came across a Stackoverflow post and discovered that the issue was that in these versions of Edge they were supporting an earlier version of the Flexbox specification which meant that the percentage-based padding-top had no effect, basically rendering these elements with a ‘0’ height so they didn’t show up. It seems that the Flexbox specification was updated circa 2018 and basically brought it in line with the way Chrome and Safari have always behaved.

An alternative way of specifying the padding-top value is to use the ‘vw’ viewport-width units instead of percentages, whilst I found this did work to some extent it was harder to keep the ratios exactly how I wanted, but at least it was a way that would get these elements working in older version of Edge. Rather than having to completely redo my markup and CSS just to support these older browsers I wanted to see if there was a way to target only these earlier versions of Edge and use ‘vw’ units for Edge 15 & 16 but keep percentages for all other browsers.

As it happens I was also using “Variable Fonts” on this site which are only supported in Edge 17+, as such as I was already testing for Variable Font support by using ‘@supports (font-variation-settings: normal)’, so combining this with another parameter ‘(-ms-ime-align: auto)’ which allowed me to target Edge I came up with a workaround.

Here’s an example of how it would be used, in this case it is a 3-up layout so each element is 1/3rd of the page width so set at 33.33333% of the width and then a padding-top set to the same percentage. The first CSS block sets the main styles and the second block adds the ‘@supports’ check which overrides the first for matching Edge versions:

.aspect-block {
    padding: 0;
    position: relative;
    flex: 0 0 33.33333%;
    height: 0;
    overflow: hidden;
   padding-top: 33.33333%;
}
@supports (-ms-ime-align: auto) and (not (font-variation-settings: normal) ) {
    .aspect-block  {
        padding-top: 33.33333vw;
    }
}

Mental note: Set ‘register_meta’s ‘single’ parameter appropriately or you end up with data across multiple custom fields

This is a mental note for my own future reference after spending several hours trying to debug why some data was getting magically broken apart into multiple meta data fields.

In this case I was submitting a string of JSON data (created using JSON.stringify) via $.ajax in jQuery to create a ‘user_meta’ field via the WP Rest API. I could see from the response after successfully posting that the data was breaking up into multiple parts and was showing up as an array in the Ajax response, sure enough looking at the data in the WordPress ‘user_meta’ table I could see that there were a whole load of entries created from pieces of the single string I had sent.

After searching online for solutions and trying quite a few things I managed to narrow it down to which bit of code might be the cause, I was struggling to figure out whether it was happening during the AJAX request or on the server within WordPress.

However, I was aware that when rendering meta data using ‘get_user_meta‘ or ‘get_post_meta‘ that it will bring up an array as the default format as it is possible to have multiple meta fields with the same name, so when requesting a meta field you can set the ‘$single’ parameter to ‘true’ and this will return only a single value.

However, I hadn’t realised that you can actually specify that the fields are only to ever have a single instance when you register them using ‘register_meta‘, after setting this parameter my submitted JSON string happily went into a single user_meta field!

You can set the meta field to use a single parameter when registering like so:

register_meta( 'user', 'my_meta_fieldname', array( 'type' => 'string', 'single' => true ) );

Hopefully this will stay in my head now and I’ll remember if this happens again!


WatchOS 5 adds support for web content rendering

Apple recently announced updates to the core software on all of their hardware platforms with various interesting new features.

One feature that jumped out when looking through it all was support for displaying web content in watchOS 5, it’s important to clarify that they haven’t added a standalone Safari app to watchOS but instead it enables any links sent via Mail or Messages to be accessed and then displayed right on the watch.

To get a quick overview it is worth taking a few minutes to watch the “Designing Web Content for watchOS” video on the WWDC2018 videos site as it gives a good overview.

Here’s a few thoughts and info about key aspects that I picked up from watching the video:

User navigation / interaction

  • You can scroll using the Apple Watch’s digital crown or via pan gestures
  • Double-tap to zoom in / out on the page content
  • Back/Forward navigation is controlled either via an overlay UI brought up via a  firm press on the screen or by swiping back and forward from the edges of the screen.

Web browser feature support

Content is optimised for display on the Apple Watch so certain features are not supported in watchOS 5:

  • Video playback
  • Service workers
  • Web fonts

If the web content being accessed is responsive then it treats the content as being 320px wide, the same width as if on an iPhone SE (iPhone 5 or older width). So text may be smaller but at least it will basically render the smallest breakpoint content, so it doesn’t require any new even smaller breakpoint to be catered for.
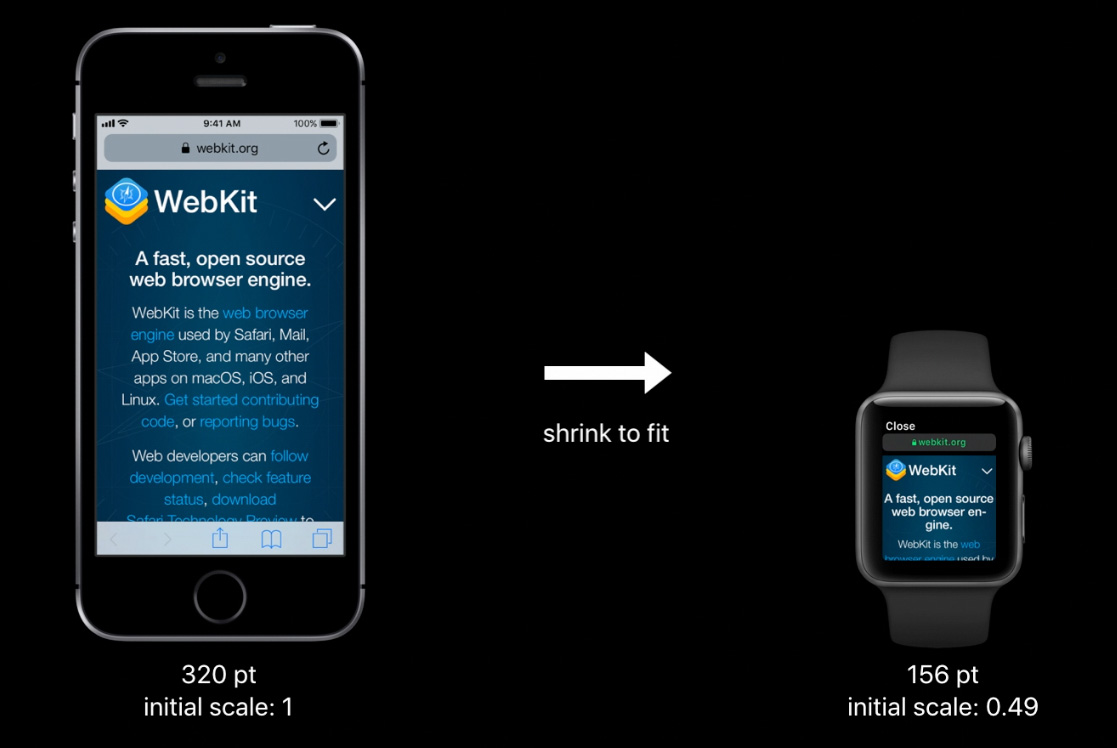
This is done by overriding the “initial-scale” value and provides a viewport with the dimensions 320px by 357px and reports a media query size of 320px. So existing responsive content will render on the Apple Watch without requiring any changes – at least from a layout perspective, worth noting the lack of support for Web fonts as this will likely have some rendering impact as it falls back to alternative fonts in the font stack do display.

Optimising content for Apple Watch

Even though responsive content will be rendered quite well by default it is possible to optimise content for display on Apple Watch.
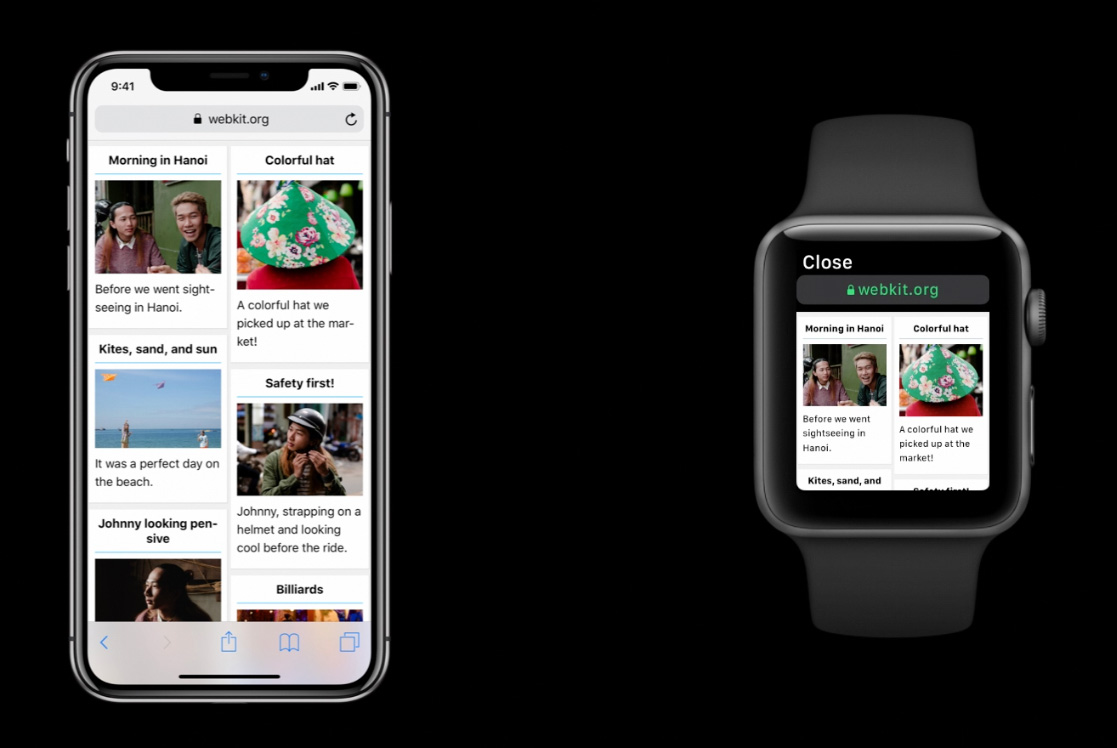
The above image shows the standard responsive content being displayed on the Apple Watch, basically just the same as it would be on an iPhone SE (minus any web fonts of course!).

Responsive Layout on Apple Watch

Using a media query it is possible to modify this layout to display as a single column. There is an example given in the video which obviously won’t apply for all uses, but basically it uses “min-width: 320px” as the baseline for showing the content as two columns, so any content below that would render as a single column. Again, how this works specifically for your layouts will vary, but there will be some methods to use for frameworks like Foundation or Bootstrap etc.

“Disabled-adaptations” meta tag

The important addition to using a media query though is a new meta tag which disables the default adaptations that the Apple Watch makes when rendering content by default:

<meta name=”disabled-adaptations” content=”watch”>

With this meta tag in place the device width will be treated as the real width of Apple Watch’s screen. This again has similarities to how content was handled when the iPhone originally came out, existing content is displayed as best as possible but there are ways to optimise for the device if you want to.

Form controls on watchOS

Making use of HTML5 form control types is really important on watchOS, setting the type attribute to “email”, “tel” etc will bring up a specific, full screen UI to allow interaction.
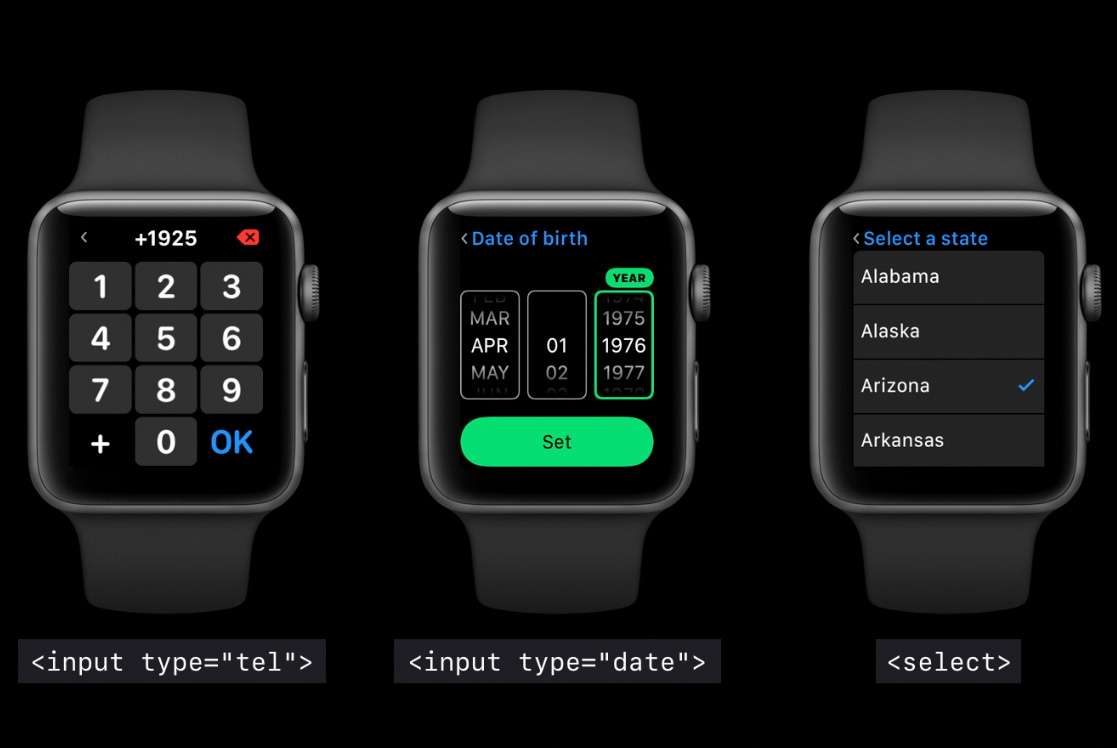
Additionally making use of labels, placeholder or aria-label attributes enhance the context given when interacting with these controls. Hopefully you’re using these already but here’s another reason to do so.

Safari Reader on watchOS

This is a feature found on iOS and macOS which basically formats pages to show a more readable version of web page content. It’s a little unclear from the video but it sounds like pages that are “text heavy” will get displayed using Reader, although I’m not 100% sure how that would be determined exactly if so. Perhaps this is a way to handle big pages that might have a lot of adverts on it? Reader view is an option that users can choose by firmly pressing on any page to bring up the navigation overlay, so even if content is displayed normally a more readable version can be accessed.

Semantic markup in Reader view on watchOS

Reader view makes good use of semantic markup, using the “article” tag helps the display of content, and attributes like “item-prop” and other semantic tags like “strong”, “em”, “blockquote” etc enhances the display of content in Reader on watchOS.

Open Graph meta tags

Using Open Graph meta tags is something that makes sharing content around the web such as into Facebook, Twitter etc look better by providing specific preview content such as images, titles etc. watchOS makes use of these Open Graph meta tags to make the previews for any shared links look as good as possible.
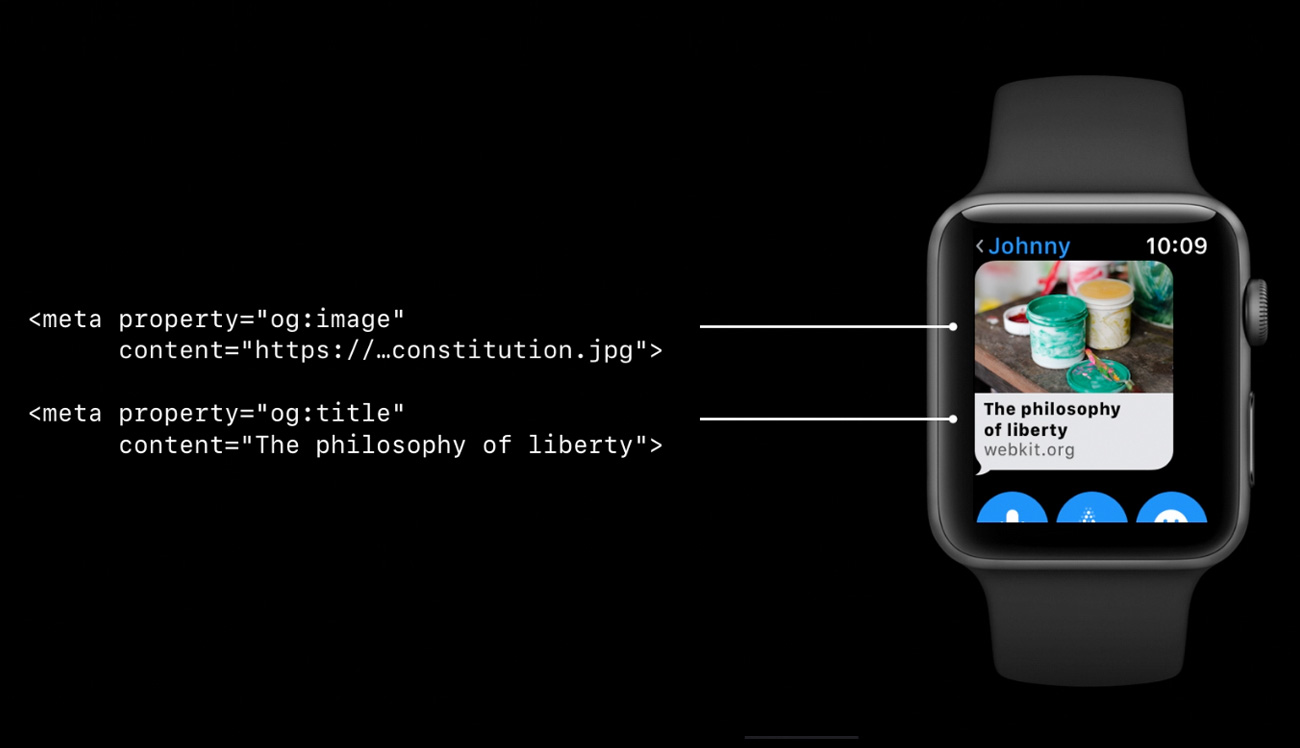

That’s a quick overview of some aspects of watchOS 5’s support for web content, there’s definitely a few things to consider in there but if you’re building pages using responsive layouts and using semantic HTML then things should work fairly well without having to do anything.

The biggest issue I see initially is the lack of support for web fonts, that seems like it could cause some display issues due to the fallback to alternative fonts in the stack or if web fonts have been used for icons etc.

I’m also interested to know what the impact on battery life on the watch is like when loading and rendering multi-megabyte web pages which are not uncommon these days, I think Reader view is going to be an essential feature for viewing web content on Apple Watch.

GDPR, Privacy and WordPress

Over the last few weeks and months if you’ve been on any kind of email subscription list you have undoubtedly had at least one email (likely with a pleading tone!) asking you to re-confirm your permission to receive emails. These emails have all been prompted by the new General Data Protection Regulations, or more commonly by the acronym GDPR which is in force under EU Law as of May 25th 2018.

These impending regulations coupled with the fallout from the high profile Facebook / Cambridge Analytica data mis-use has brought the whole issue of data protection, privacy and handling of user data to the forefront of people’s minds. The consequences of mis-use of personal data provided to websites have been shown to be potentially far reaching.

Personal Data and Privacy

In the light of both GDPR and Facebook’s privacy issues the development community around WordPress has been quick to respond with enhancements to increase its compliance with the requirements of GDPR. WordPress 4.9.6 was released 17th May was a minor update in version numbering but added a few new settings and controls in the WordPress backend to help with compliance, the following is quick overview of what has been added and what the intentions are behind them.

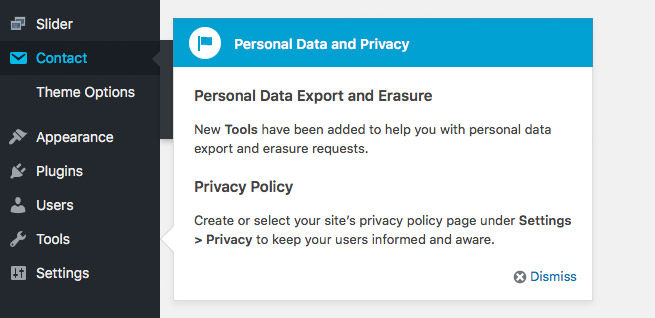
After updating to 4.9.6 you will see a popup highlighting the new “Personal Data Export and Erasure” features that have been added to the Tools menu, along with a new Privacy feature in the Settings menu.

Privacy Policy

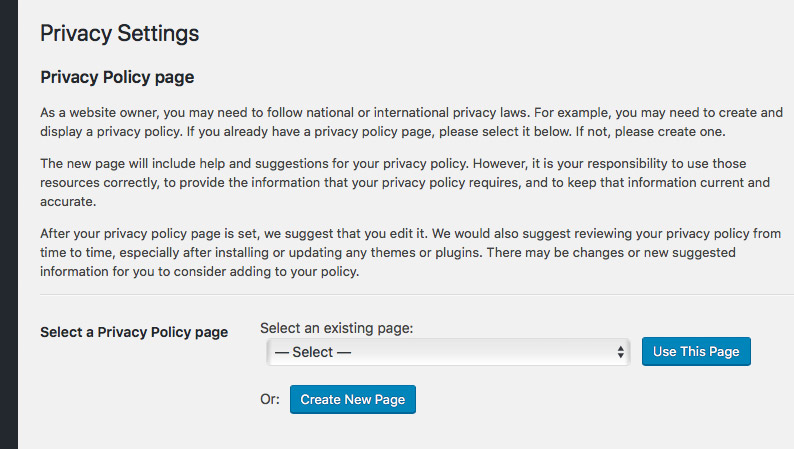
Accessing the new Privacy feature in the Settings menu will show a general overview of why you may need to add a Privacy Policy page to your website. Whilst GDPR is currently the most prominent regulation which may affect the legal need for a privacy policy page there are also other regulations in place around the world.

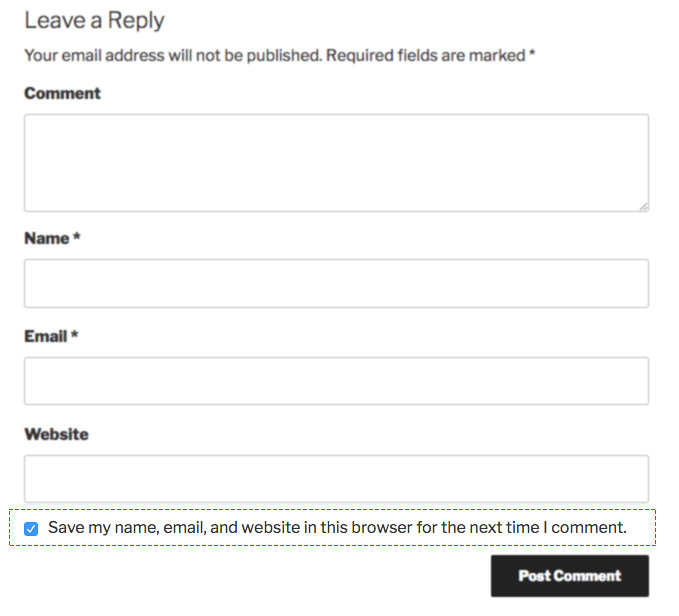
You can then select an existing Privacy Policy page if you have one or you can click the “Create New Page” option which will add a new page to your site with suggested privacy policy content, which you can then edit. Some of this content is more broad generic privacy information but some such as the “Comments” section details information that may be held when users comment on your WordPress site. So even if you do not have users logging in to your website it is important to note that the process of simply leaving a comment on your website involves the person doing so to provide some personal information in this process and the saving of cookies in the user’s browser. Subsequently there is a new permission checkbox on comment forms to allow users to explicitly consent to this.

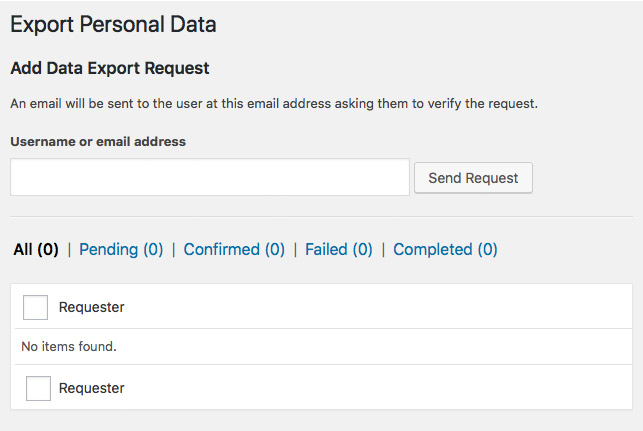
Export Personal Data

In the Tools menu there are two new features added to provide a way to manage the personal data of specific users’ data on your website. Regulations like GDPR require that users are able to request to see all of the data that your website may hold about that user, the new “Export Personal Data” function allows you to enter the email address of a user which will then email a link to a zip file of all of the data held relating to that email address.

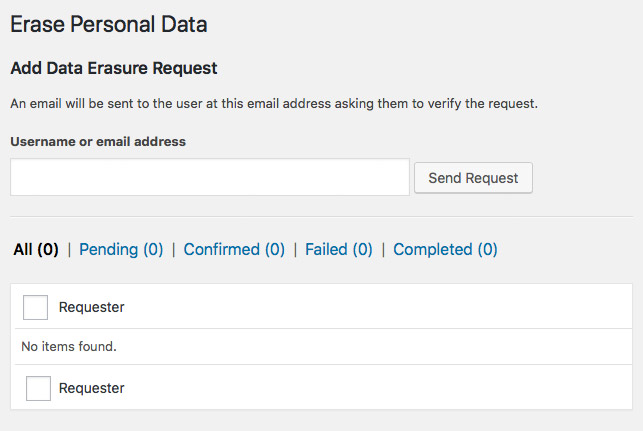
Erase Personal Data

The second new addition to the Tools menu is the “Erase Personal Data” function. This provides a way for any identifying information related to a user to be erased from the site. It’s worth noting that this doesn’t delete actual comments from the site but it does remove any way for these to be identified either on the front-end or back-end of the website.

You enter the email address of the user requesting erasure of their personal data into the field and then this will send out an email to the user asking them to confirm the erasure of their data, so it puts the ultimate control of this data in the user’s hands.

Are you a plugin developer?

If you are a WordPress plugin developer then hopefully you haven’t been oblivious to these changes that have been happening in WordPress core, but if not then it’s worth taking a look at the update guide for WordPress 4.9.6 as there is some impact on plugin developers. Particularly if your plugin handles any personal user data then this may be extremely important for you to get up to speed on: https://make.wordpress.org/core/2018/05/17/4-9-6-update-guide/

You should also have a good read through the Privacy section of the Plugin handbook: https://developer.wordpress.org/plugins/privacy/

What next?

These tools in WordPress core are just the start of an increased focus on user privacy and data security within WordPress and the many plugins in the WordPress ecosystem. You can expect some further additions in future releases and in particular new features added to third-party plugins in the interest of data protection and privacy.

Dreamweaver CC Public Beta

Adobe have just opened up a public beta of a revamped version of Dreamweaver offering a lot of improvements and useful features for modern web development.

Dreamweaver’s had it’s share of flack over the years and not all unwarranted, but this new beta looks to shed some of the baggage of its 19 year history with a refreshed user interface and a new code editor based on the Brackets codebase. For someone like me who spends most of the time in code view (and who has split their time between Brackets and Dreamweaver for the last year or so) there’s some nice new features in there that make it a more compelling environment for code-first users.

Continue readingDreamweaver CC Public Beta