Mac OSX 10.6 brought quite a few new but subtle features and changes, one of those subtle changes was the dropping of support for the AppleTalk protocol. Many people who upgraded to Snow Leopard (or newer versions of OSX) got caught out and suddenly found themselves with a non-functioning printer.
I was aware of this change but even so I found myself in the same position, and despite all the various articles and posts I read I couldn’t get my Konica Minolta PagePro 9100 printer working. I resorted to sharing my printer via an old iMac that was running OSX 10.4 and printing that way, it worked but would take a long time to print a single page and frequently had to be rebooted to keep it working.
After running like that for a few months I decided to try and figure out how to get the PagePro 9100 working directly again as I couldn’t handle using the same slow process any more. Amazingly I managed to find a Konica Minolta setup guide and it actually worked! So here’s the process:
Configuring a PagePro 9100 printer under Snow Leopard
I followed instructions in an old Konica Minolta support PDF document that you can download from the Konica Minolta site, unfortunately their site is rubbish and doesn’t let you link to files easily so here’s a link to download it:
http://dl.dropbox.com/u/18567/Crown-MacOS10_3-installation.pdf
Note: Before you start you’ll need to know your printers IP address, the PagePro 9100 can be set to have a fixed IP address but this wasn’t needed when printing using AppleTalk so yours may not be set up with one. You’ll need to get that changed using the printer’s controls on the top. You really need to get this sorted out before you can proceed any further. Update: See end of article for help with IP address settings on your printer !
Ok, here’s the simple setup process:
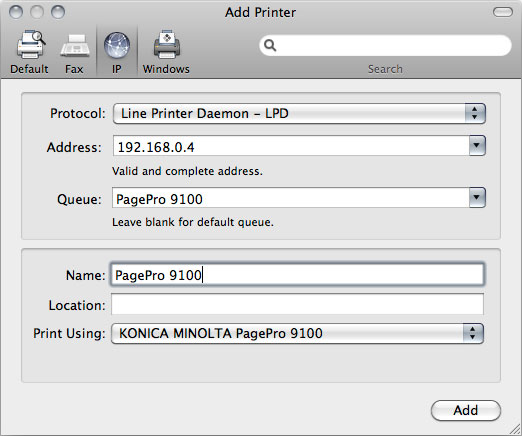
- You need to set the printer up using the IP printing method, you’ll see a blue circular globe icon in the Add Printer dialog so click that option.
- Use the Line Printer Daemon option under the ‘Protocol’ drop down.
- Enter the fixed IP address of your printer into the ‘Address’ field.
- Enter a queue name in the ‘Queue’ field (I used PagePro 9100).
- The ‘Name’ field will probably have taken the IP address automatically but this can be changed to PagePro 9100 too.
- Select the ‘Select Printer Software’ in the ‘Print Using’ dropdown at the bottom. You should be able to find the Konica Minolta PagePro 9100 PPD file in the list. Choose that from the list.

Set the appropriate trays / bins etc for your printer etc and then that should be you set up hopefully!
Addendum: Configuring the IP address settings on the PagePro 9100
In response to a request for help in the comments below I’ve added some instructions on how to configure the IP address settings on the PagePro 9100. Configuring the settings is a bit of a pain due to the tiny little single-line display on the printer, but hopefully these instructions will help!
You need to make sure the printer is not getting a dynamic IP address via DHCP, so you need to disable DHCP on the printer. Once that is switched off you can then set the fixed IP Address that is required in order to set it as per the instruction in this article.
To get to the settings to do this press the green ‘Online’ button on the printer controls to put the printer into Offline mode, then use the ‘Select’ / ‘Next’ / ‘Previous’ buttons to move through and select options.
You need to drill down to the following settings:
Menu -> Administration -> Communications -> Optional NIC -> Crownnet -> TCP/IP
Now that you are in the TCP/IP options you need to disable DHCP, select ‘DHCP’ from the available options (there are quite a few to choose from, just keep clicking through using the Next/Previous buttons), set this to ‘#disabled’ and then click the ‘Menu’ button once to move back up one level.
You now need to set the fixed IP address, you should be back up one level with ‘DHCP’ showing in the screen. Click next a few times and select ‘Internet Address’, you should now be able to enter all the digits of your IP address. Please note that you need to include 3 digits for all four parts of the address, so rather than just ‘192.168.0.4’ you need to enter ‘192.168.000.004’.
Make sure to use whatever IP address range your network runs on, routers use various different ranges so you need to set an IP address that is appropriate for your network’s range.
Addendum #2: Get default page size on PagePro 9100 to be A4 instead of ‘Other’
If you’re using the PagePro in the UK or at least with UK region settings in order to print to A4 paper then you may find that whenever you print that the printer always uses a default page size of ‘Other’ instead of A4. Although this actually prints to A4 correctly it always bothered me that it showed this way, so I decided to figure out what the problem was.
After a bit of looking around in the PagePro 9100 OSX EN.PPD file I found all the entries relating to A4, in PPD files the dimensions of paper sizes are configured using a dimension called points, basically there are 72 points to an inch. In the case of A4 in this PPD the dimensions used are 596 by 842, however, A4 is a metric-based page size of 297mm by 210mm so I checked out what these convert to in points.
It turns out that the PPD rounds all of the page dimensions to the nearest point, so I then edited the PagePro’s PPD file to use the accurate point dimensions for A4 which are 595.28 by 841.89 (you need to replace it in a few locations in the file). I then re-setup the printer with the updated PPD and it now uses A4 as the default page size once more! It seems that OSX 10.6 is fussier about the specific page dimensions than OSX 10.5 was, but this tweak sorts it out. I’m sure you could modify the PPD for any other paper format that you wanted to use, just google the correct point dimensions for your page size and the update it in the file.
Here’s a link to an already modified PagePro 9100 PPD file with updated A4 dimensions to save you having to tweak it yourself.
Addendum #3: OSX 10.7, 10.8, 10.9, 10.10, 10.11, 10.12
These instructions will basically work for all version of OSX since Snow Leopard, so 10.7 Lion, 10.8 Mountain Lion, 10.9 Mavericks, 10.10 Yosemite, 10.11 El Capitan definitely all work and 10.12 Sierra should be fine too as the protocols used are the same.


 Mac OSX 10.6 brought quite a few new but subtle features and changes, one of those subtle changes was the dropping of support for the AppleTalk protocol. Many people who upgraded to Snow Leopard (or newer versions of OSX) got caught out and suddenly found themselves with a non-functioning printer.
